Home » Posts tagged 'techtips' (Page 2)
Tag Archives: techtips
TechTips: Organizing your Sites@Duke dashboard
 How many Sites@Duke WordPress sites do you have? Do you have a bunch of sub sites created for a particular course that you would like to group together? Now with My Sites Enhanced, a feature created in-house for Duke WordPress sites, you can organize your sites into folders that you name. You can organize your sites by semester, by a particular project or course or whatever works best for how you want to organize your sites!
1. Log into Sites@Duke (sites.duke.edu)
2. Click on Dashboard > My Sites Enhanced.
3. Create a new folder (e.g. summer2015).
4. Click Submit or hit enter on your keyboard.
5. Using the drop down menu under each site, assign the site to the appropriate folder.
6. To see only the sites assigned to a particular folder, click on the Filter By Exisiting Folder Option and click enter.
TechTips: Sending files to Box via email
 You can easily send files to a specific Box folder via email when you enable the Allow uploads to this folder via email option in Box. This feature is great for collecting any type of submissions from a group of people – this includes any electronic document (even photos!)
- Log into your Duke Box account (http://duke.box.com).
- Create a new folder, then enter the folder. (NOTE: You can also enter an existing folder.)
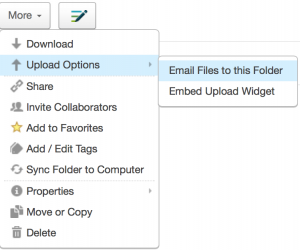
- Then go to More > Upload Options > Email Files to this Folder.

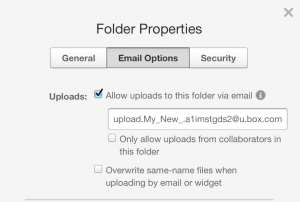
- When the Email Options tab in the Folder Properties window, select the Allow uploads to this folder via email option. A unique email address will be generated for the folder.

- Click Save to apply your settings.
Note:
- Upload via email only works for file attachments, the body of the email will not be uploaded to Box.
- The cumulative size of the attachments cannot exceed 80 MB (or 25 MB when sending from your Duke email account).
- The folder owner and sender will receive a notification that files were uploaded successfully.
- Collaborators will also receive a notification if upload notifications are enabled for the folder.
TechTips: Linking directly to a specific lynda.com video!
 You may already know that you can share a link to a specific lynda.com online training course with anyone at Duke via a quick email….But did you know, that you can also connect to a specific video within a course. This is especially useful if you want someone to watch part of a course, or just direct them to the information they need quickly.
- Go to Duke’s lynda.com training library: http://training.oit.duke.edu/lynda/.
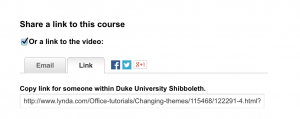
- Locate the Share link. (Share may be on the left or top of your page, depending on which viewing mode you are in.)

- Check the link to the video option. Then, Copy the with someone at Duke University link into an email from your Duke e-mail account. (e.g. this video on changing themes in the “PowerPoint 2013 Essentials” course: http://www.lynda.com/Office-tutorials/Changing-themes/115468/122291-4.html?org=duke.edu)
When the person you shared with goes to this link, they will be prompted to log in with their Duke NetID and password and be directed immediately to this specific video.
—-
Duke students, faculty and staff can access of the entire lynda.com online training library anytime, anywhere – 24/7 and 365 days a year through our lyndaCampus site license. For details and to connect, go to: http://training.oit.duke.edu/lynda/
TechTips: Web Options at Duke

OIT has several web options and resources including: Sites@Duke, Box, Sakai and DukeWiki. Watch the video below to learn more. Visit the OIT website for more details and to get started with each service.
TechTips: Checking your Duke email from your smart phone
 Did you get a new smart phone over the holidays?
Watch these OIT Training developed instructional videos to learn how to set up your Duke email on the iPhone and Android devices.
For questions or assistance, contact the OIT Service Desk.
TechTips: Setting up your out of office email within Office 365
 Planning to be out of the office for extended period(s) over the holiday? Don’t forget to set your Out of Office email (a.k.a. Vacation email). Follow the steps below in Office 365 to automatically email the sender. NOTE: The sender will receive your email once during the period you select.
Setting up your Out of Office Message
- Log into Office 365 from http://mail.duke.edu.
- You must select the Outlook application tab at the top right of your screen (vs. being inside of your calendar, etc.).
- Select the gear
at the upper right corner of your screen (just to the right of your name).
- Select Options.
- Select Set up an automatic reply message. You can specify the time period automatic replies should be sent and can even customize a note for anyone outside of our organization.
- Fill in the text of your automatic reply and click Save.
Questions? University customers can contact the OIT Service Desk. Duke Medicine customers can contact the Duke Medicine Service Desk at (919) 684-2243.
TechTips: Create a quick website with Sites@Duke
 Need to create a website for an upcoming event, a special interest group or student organization, or for your own personal portfolio? Consider Sites@Duke, Duke’s WordPress Service. There is no user-limit on the amount of sites you can create as long as you are abiding by existing policies.
To create a site:
- Go to sites.duke.edu and click login in the upper left hand corner.
- Select Click here on the WordPress login screen to get to the shibboleth page to log in with your Duke NetID and password.
- Go to Dashboard > My Sites > Create a New Site.
- Give the site a name (sites.duke.edu/yoursitename) and a title. (Remember you cannot use any spaces or special characters in the site name.)
- Click Create Site and the URL is yours.
Visit the Getting Started section of sites.duke.edu for information about how to get started. Also, check out available help resources.
TechTips: LastPass – the last password you’ll ever have to remember
 Are you tired of remembering all of your passwords or having to create a new secure password each time you visit a new site or service? LastPass to the rescue!
NOTE: Duke users get free access to the premium version of the LastPass password management service. With the premium upgrade, Duke users can take full advantage of LastPass’ secure cross-browser, cross-platform syncing capabilities to access login data from anywhere, at any time. LastPass is available for download through the OIT Software Licensing website.
Getting Started: Saving a Site
LastPass remembers and fills your passwords. After downloading LastPass, you’ll see the LastPass icon ![]() in your browser toolbar.
in your browser toolbar.
When you go to your sites, you’ll have the option to save your password.
1. For example, go to Amazon.com
2. Click on the Last Pass Icon on your web browser, then Sites > Add Site.
3. You will then be prompted to add in your username and password and then click ok.
4. Now when you visit, Amazon.com the next time, go to the LastPass icon again, go to Show Matching Sites > Amazon.com > AutoFill and it will automatically fill in your user name and password. You can then click sign in and automatically go to the site.

Generate a long, strong password
Strong passwords are key to good security. When you signup for a new online account, LastPass can generate a strong password for you. Just click on the Generate Secure Password icon. (HINT: Consider changing your Duke NetID password!)
More information on how to use LastPass can be found on the LastPass website (https://helpdesk.lastpass.com). Also, check out the upcoming Learn IT @ Lunch session “Protect your Identity with LastPass and Multi-factor) on October 22, noon – 1:00 p.m., in Room 217 Perkins Library. No registration required. Bring a brown bag lunch.
TechTips: Share, Collaborate with Duke’s “Box” Service
Check out this “Tech Tips” article in Duke Today to learn how Duke faculty, staff and students can use the new Box service to access, store and share content securely and become more productive!
TechTips: Using Commenting in Duke’s Box
 We’ve all been there, circulating a document via email to get feedback. Now you can eliminate those long email chains and collaborate more efficiently with Duke’s Box using the commenting feature. Comments will help you track discussions around content. You can view and reply to comments through email or on Box Mobile.
Creating a Comment
- Expand a file to view its contents. In the comments section of the file page, select Enter a Comment.
2. Enter your comment and click ‘Add Comment’ to add your comment.
Replying to a Comment or Deleting a Comment
- Mouse over an existing comment and click Reply or Delete. NOTE: you can only delete comments that you created.
To learn more about commenting and tasks in Box, visit Duke’s Support@Duke Knowledge Base. Also, be sure to stop by the upcoming Learn IT @ Lunch session “Collaborating Made Easy with Box” on Wednesday, September 17, noon – 1:00 in Room 217 Perkins Library. No registration required. Feel free to bring a lunch.
—-
Duke’s Box is a cloud-based storage and collaboration service for all Duke University and Duke Medicine faculty, staff and students. With Box, users can access, store and share content securely with Duke and non-Duke users — anywhere, anytime, on any device. For information about how to get started and log in, visit: http://box.duke.edu/.


