


Starting academic year 2024-25, we are introducing our pilot, hands-on, longitudinal POCUS curriculum within the Duke Nephrology fellowship program. Below you will find an outline of the curriculum, resources to help you use our new EchoNous Kosmos Ultrasound system (currently available at Duke, will be available soon at the Durham VA), as well as instructions on how to keep a portfolio of all your scans throughout your time at Duke. This rotation will launch September 16th, 2024, see below for schedule.
Pre-course survey
Please complete the following survey before your first scanning session:
https://forms.gle/a4uyQCA2uhinEdU67
Your responses will be submitted anonymously. Please only submit once. If you run into issues, please reach out to Mike Turk or Matt Sparks.
EchoNous Kosmos Platform
Starting a scan
- Unlock the iPad
- Open the Kosmos app
- Click on + in the bottom left

- First name X, Last name X (we will not be putting patients’ names into the system in order to protect PHI)
- Under MRN, label your scan as follows: 6-digit date – 3 initials – number of scan that day (no dashes, commas or spaces) e.g. 081624MNT01
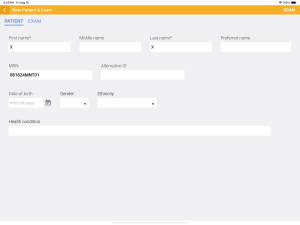
- Click scan (top right corner) to get started
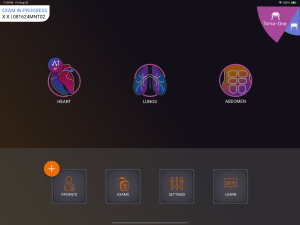
- Make sure to select the probe you would like to use in the top right corner. The Torso-One serves as our phased-array and curvilinear probes. The Lexsa serves as our linear probe.
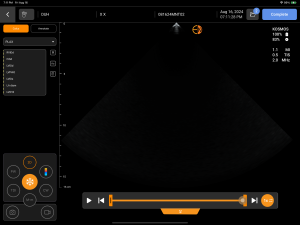
- Note the unique identifier now in the top left corner of the screen.
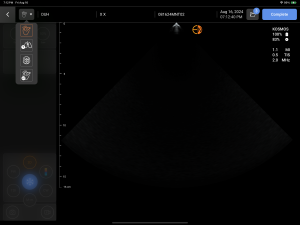
- Start obtaining images. Use the camera icon in the bottom left for still images, and the camcorder icon for clips (our default setting is prospective recording)
- Click on the snowflake in the bottom left corner to freeze your screen. When it is blue the screen is active, when it is orange, the screen is frozen.
- Once a screen is frozen, you can annotate and label it, as well as measure structures using the icons that appear in the top left corner.
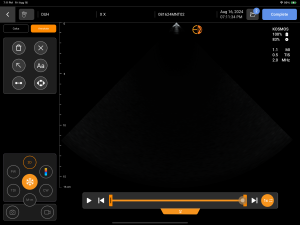
- After annotating an image, make sure you click on the camera icon in the bottom left again to save the picture with the annotation. If you forget to annotate your image, you can do it after the fact (but before you “complete” your scan, but it is a slightly tedious process, so please make sure to annotate your images before you save them. This is very important for quality assessment (QA) and review of scans.

- When the screen is active (note blue snowflake), you can use the Kosmos platform’s unique AI features to assist with obtaining your images. These are available primarily for cardiac POCUS
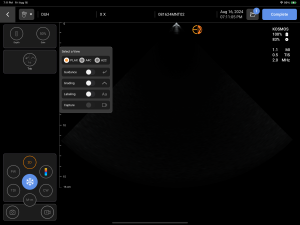
- You can change the ultrasound presets by clicking on the organ icon in the top left corner of the screen and selecting the intended organ of interest.
- Once you are done with your scan, you can click the folder icon in the top right to review your images.

- Once you are done reviewing your images and are ready to complete the scan, click the complete button in the bottom right corner (note it is in the top right corner on the previous page)
Exporting images
- First, plug in your flash drive into the iPad. You will need to unplug the probes from the iPad. Please remember to plug the iPad back in after you take your flash drive out so it can remain charged up for the next person.
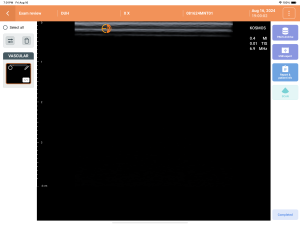
- To review completed scans, click the Exams button
- Click on the scan you want to export

- On the right side, click USB export
- Click OK (default selections should be “All images/clips” and “JPEG/H.264”, and you do not need to include the report, or patient information)
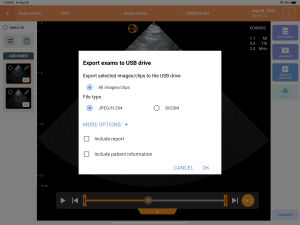
- Make sure your flash drive is selected on the left, then click save in the top right corner of the pop-up box.

- Again, please remember to plug the probes back in when you are done so the device is charged for the next person who will use it.
Completing a report
- On the home page of the iPad, find the link to the appropriate Google Form (Renal-GU, Cardiac, etc)
- Fill out the Google form (links below)
Report Google Form Links
Kidney-Bladder: https://forms.gle/Upope7LKmweKDRNA8
Cardiac/Volume status: https://forms.gle/aWBUC48GSNfEtSFK8
Lung: https://forms.gle/2UGj6nzXFK6Qx1HA7
Vascular access: (upcoming)
Ultrasound Rotation Schedule
Date VA fellow/DCT fellow
12/2 Tharakan/Varshney
12/9 Tharakan/Varshney
12/16 Sreenivasan/Martin
12/23 OFF
12/30 OFF
1/6 Ludwig/Martin
1/13 Martin/Sreenivasan
1/20 Martin/Sreenivasan
1/27 Turk/Catanese
2/3 Tomasi/Phekoo
2/10 Varshney/Sreenivasan
2/17 Phekoo/Turk
2/24 Ataei/Phekoo
3/3 Vaidya/Phekoo
3/10 Tharakan/Turk
3/17 Tharakan/Vaidya
3/24 Phekoo/Vaidya
3/31 Ludwig/Turk
4/7 Sreenivasan/NONE
4/14 Martin/Vaidya
4/21 Tomasi/Catanese
4/28 Tomasi/NONE
5/5 Varshney/NONE
5/12 Varshney/NONE
5/19 Ataei/NONE
5/26 Ataei/NONE
Mike will reach out to you a few days before the start of your rotation to decide together on a day to scan (will always try for later in the week to give you time to get to the know the service).
Throughout the week on service, mark down some patients that might be good to scan together either for educational purposes or to answer a directed clinical question at the bedside.
This should not take more than an hour out of your day.