


2.Review and Improvement
Because of the limited time and energy, we decided to just study the first part in this semester. Then after several times review, we conceived the blueprint of a Smart Home Service Robot, SHSbot. It is one kind of intelligent and practical Robot arm, which was designed to help people collect garbage on table top such as wasted papers or sola cans and so on, also organize the table top orderly.
The SHSbot is designed to sit on a corner of a desk and help people perform trivial tasks within the range of the robot arm. It obtains environmental information through the camera, and then controls the movement of the robot arm to complete the corresponding task according to the command of the human. These tasks can be cleaning desktops, cleaning up trash and passing things around. For some more professional applications, by changing the mechanical arm business manipulator can be completed, such as the welding work in the mechanical laboratory can be changed to its manipulator welding equipment to complete. Like Tony’s robotic arm on the right.


To further simplify the task, make our goals clear and available, we build a specific situation and task here.
In this project, we want to make a robot arm able to clean up our desks automatically. We use a robot arm to do pick and place motion and incorporate computer vision and deep learning to recognize items and detect their position.
In the experiment, to demonstrate the service we wanted to achieve, we separate one desk into two areas. As shown in the picture below, some items we daily use are please in order in area B. When we use them, we usually just put them back on the desk randomly which is the situation in area A. So, in the experiment, we will record the initial position of items in area B and then put them on area A randomly. Finally, we want our robot arm to recognize the items and locate their position, and then pick them up and place them back in order on area B.


The next step for us is to organize and divide our project into small and reasonable tasks. Due to the special feature of ROS (Topic Publication and Subscription), we can development different part respectively and then construct communication programs to put them together. Therefore, following some reference we found, we divide our project into three parts, and each of our group member focuses on just one of them, which is represented by using different color in the figure. We mainly have four subjects: vision, motion planning, simulation and control. Vision part can be divided into depth camera using and calibration, object detection. Moveit will be used in motion planning. To complete the robot simulation in ROS, we also need to build robot configuration file and set some property parameters. Finally, to control a really arm, we need to finish serial communication and controller setup. In addition, we also use 3D printing, laser cutting and other methods to complete the hardware construction.
- Shucheng’s part is using depth camera to do object detection and publish position of target item to node in Moveit.
- Yu’s part is to simulate armbot in Gazebo.
- Jiaxun’s part is using ROS to control the motion of real armbot. (Detailed tutorial is in his personal page)
More detailed implement and develop will be showed in the Skill level and Implement detail part.

In conclusion, this is a very complex and ambitious project for us to do in one semester. So far, we finished most of the planned work, but we haven’t actually made the hole system work successfully. Some problem is really hard to solve not only because of theory, but also due to multiple bugs in hardware. As shown in the picture below, we haven’t finished the joint calibration of camera and robot arm, the communication between object detection and Moveit and the communication between Moveit and Arduino. These parts will be the future work of this project.

1. Ubuntu, ROS and Jetson setup
What I have done is based on Ubantu 18.04 and ROS Melodic, on Nvidia Jetson Nano platform.
The environment setup is as follow:
2. Basic understanding of ROS and ROS programming
This is the foundation of ROS using, we found some tutorials for beginner to start quickly.
3. 3D modeling (SolidWorks/Onshape)
For beginners in the field of Robotics, it is not recommended to create the entail modeling of the robot arm by themselves, even though some of beginners obtain brilliant 3D modeling skills. Any mistakes in kinematic parameters of the model may affect the subsequent development of the project negatively and lead the failure of the generation of URDF, so we download its assembly file from this website. Such model files shared on the website are generally modified and applied hundreds of times by the creator or users, thus our project can have a good platform for the next stage of development.

4. 3D printing
5. Linear algebra and probability theory for Machine Learning
If we want to build and use mature deep learning networks, we don’t need a strong mathematical foundation. Undergraduate calculus and linear algebra are sufficient.
1. Understand robot arm kinematics (DH parameter)
2. Use limit switch to set initial position of step motor (Arduino)
3. Create robot URDF file
The Unified Robotic Description Format (URDF) is an XML file format used in ROS to describe all elements of a robot. To use a URDF file in Gazebo, some additional simulation-specific tags must be added to work properly with Gazebo. Here is the URDF generation tutorial. And here is another approach which will be more efficient and more feasible for Mechanical Engineering student. We already have the integral 3D modeling of the SHSbot in SolidWorks, after doing some modifications and defining some joints, we exported the modeling Assembly to URDF from the SolidWorks to URDF Exporter, here is the website shows how to apply SolidWorks to create the URDF. Here are two main parts of the modeling.


4. Robot configuration file generation (Moveit setup assistant)
5. Image processing and OpenCV
Computer vision refers to the use of computers to realize the visual function of human beings, namely the perception, recognition and understanding of three-dimensional scenes in the objective world. Therefore, the realization of computer vision not only needs to enable the machine to perceive the geometric information (shape, position, posture, movement, etc.) of the objects in the three-dimensional environment, but also enable the computer to describe, store, recognize and understand them. It can be considered that computer vision is to build models with the help of geometry, physics and learning techniques, and to process data with statistical methods. Compared with image processing, the focus of computer vision is to use the computer to recognize the image, rather than to process the image.
OpenCV is a cross-platform computer vision library based on open-source publication, which realizes many common algorithms in image processing and computer vision, and is widely used in object recognition, motion tracking, robot and human-computer interaction, etc., and has become one of the most powerful research tools in the field of computer vision .
More details can be found here.
6. Depth camera construction and using in ROS
(1)To use depth camera and implement computer vision, we need to update and install some dependences:
- Update Cmake Version
- Install QT5.9.9, VTK7.1.1 and PCL 1.8.1
- Install OpenCV
Some resources for this step:
- Cmake: Download Tutorial
- QT5.9.9, VTK7.1.1 and PCL 1.8.1 : QT Install VTK and PCL Install PCL Tutorial
- OpenCV 3 : Tutorial
(2)The next step is to install depth camera function package. We use Realsense 435i in this project, so we need to install Realsense SDK. The Install guidance is as following:
https://github.com/IntelRealSense/realsense-ros
Note: Many ROS packages depends on Realsense SDK, so we need to use Method 2 to install.
Using the command:
roslaunch realsense2_camera rs_camera.launch filters:=pointcloud
Subscribing 3 topics (
- /camera/color/image_raw
- /camera/depth/image_rect_raw
- /camera/depth/pointclound.
) in Rviz, we can get 3 outcomes (RGB Image, Depth Image and Point cloud Image). In this program, we will subscribe RGB Image for object detection and subscribe Depth Image for publishing object’s position information, because in depth image, each pixel bring the depth information of that point.

7. Traditional Object Detection Method
(1) Introduction
Local image feature description is a basic research problem in computer vision, which plays an important role in finding corresponding points in images and object feature description. Researchers built multiple computer vision techniques to deal with object recognition: SIFT, FAST, SURF, BRIEF, etc. However, traditional computer vision algorithms rely on two steps: feature extraction and classifier judgment. When there are too many categories in the image, the input of the algorithm will become very complex and difficult to classify. In recent years, the deep learning algorithm is very popular and has achieved great success in the field of computer vision. As an end-to-end learning algorithm, deep learning algorithm can automatically learn features from training samples for each specific category of images, greatly improving the efficiency and accuracy of image analysis.
(2) ORK and LineMod Introduction
LineMod method was proposed by Hinterstoisser in 2011, which mainly solved the problem of real-time detection and location of 3D objects in a complex background. With RGBD information, LineMod can deal with situations without textures without lengthy training time. Linemod feature uses gradient information of color image combined with normal feature of object surface as the basis of template matching.
(3) ORK (Object Recognition Kitchen) is an ROS integrated object recognition library. We can use this to implement LineMod in ROS.
Website: https://wg-perception.github.io/object_recognition_core/
(4) Implement
Following the tutorial here: https://programming.vip/docs/ros-kinetics-realsens-d435i-ork-linemod-object-recognition.html
(5) Result
In the experiment, I was trying to use the image from depth camera to detect the coke can and publish its position information. From the result, we can conclude that compared with deep learning method, this method does not need too many hardware resources, but this test accuracy is not very high. To be specific, the white part in the result image means the detection position of the program, but we can see it doesn’t overlap very much with the real thing, so there is a little huge error between the real thing and the detection result.

Coke can mesh model

Experiment environment

Detection result of LineMod Method

Topic graph
1. Gazebo Simulation
Gazebo provides the ability to accurately and efficiently simulate populations of
robots in complex various environments. Regularly, we Install Gazebo using Ubuntu packages. At first, we need to grasp the basic concepts of ROS and already learnt through the ROS Tutorials. Then follow the steps of Gazebo installation tutorial to download the package and begin the installation. Then install the gazebo_ros_pkgs from Source (on Ubuntu). We needed to setup a Catkin Workspace which is a folder where allow users to modify, build, and install catkin packages to begin the installation, this step is relatively complex, and we follow this particular tutorial to complete the package installation. To test whether we can run Gazebo through a simple rosrun command, after launching roscore if needed. These two commands will be the most frequent used commands:
source ~/catkin_ws/devel/setup.bashroscore &
rosrun gazebo_ros gazeboAfter the Gazebo installation and tests, we could do the path planning simulation via Gazebo in ROS environment. Besides, due to the limited running capability of jetson, and various joints, links, inertia of SHSbot needed to be defined and controlled, the path planning simulation of SHSbot is not very smooth. We applied the simplified version of the SHSbot modeling and here is the result of the simulation for path planning in Gazebo and Rivs&Moveit.
2. Rvzi path planning
3. Communication between ROS and Arduino
4. Communication between Gazebo and Moveit&Rvis
After finished the setup of MoveIt, we were able to finish the Gazebo simulation integration, the MoveIt Setup Assistant helps setup the SHSbot to work with Gazebo, but there are still additional steps required to successfully run MoveIt in Gazebo, here is a reference which include specific steps and explanation about the whole process. These steps are relatively general steps for various kinds of robot arm to achieve the communication between Gazebo and Moveit. However, because the 3D modeling of SHSbot is based on armBOT which have been introduced in our project website. Since there are already some incomplete but usable “launch” and “controller” files in the armbot project file, but such incompleteness directly leads to the communication between various platforms cannot be successfully implemented.
By comparing with the reference file, the missing controllers were generated and named, some yaml files were also modified. Created the files such as “moveit_controller_manager. launch file”, “controllers.gazebo.yaml”, and so on, also do some modifications. Here is the screenshot of the result for the path planning simulation of SHSbot.

5. ROS package writing and compiling (C++, Cmake)
A simple package can be built like this tutorial.
6. Camera calibration
The basic method can be found here.
7. Objection Detection with ML
(1) Basic concepts of deep learning and artificial neural networks
With the continuous progress of deep learning theory and artificial intelligence technology, its development prospect and application has attracted more and more attention in academia and industry. As one of its important branches, artificial neural network theory has been widely used in object recognition, speech recognition, target detection and automatic driving.
A single-layer neural network, also known as the perceptron, was invented by scientist Frank Rosenblatt. A perceptron can accept several binary inputs, and produces a binary output. These are modeled on the human brain, whereby neurons are stimulated by connected nodes and are only activated when a certain threshold value is reached.
A standard multilayer perceptron (traditional neural network).

(2) Deep learning training process
The core idea of deep learning is to take advantage of the characteristics of its multiple layers and take the output of the previous layer as the input of the next layer, so that each layer can learn a specific feature and iterate through multiple layers until the actual expression required is obtained.
The training process is as follows:
- Initialization parameter
The parameters weights and bias are initialized at the beginning of training. When weight is initialized, if the weight of each hidden neuron is set to the same size, then the influence of each hidden neuron on the output will be the same, and the same gradient size will be obtained when the backpropagation gradient descent method is used for calculation. In this case, no matter how many hidden units are set, the final effect is the same. Currently, the multi-layer neural network loses its significance. Therefore, when initializing parameters, weights should be randomly initialized. But bias, because there is no symmetry problem, can be set to 0.
2. Propagation forward
Propagation forward is to take unlabeled data (or ontology parts of labeled data) and learn from the lowest level of input data and work up to the highest level of output, while obtaining the corresponding parameters for each level. Since there is no need for the participation of labels, this part can be regarded as an unsupervised training process, and it is also a process in which the neural network learns the data set.
The output layer is usually activated by Sigmoid function for binary classification calculation, and Softmax function for multi-classification calculation; For other hidden layers commonly used to activate the ReLU function, because when, the function gradient is always 1, which greatly improves the operation speed of neural network based on gradient algorithm.
3.Cost calculation
In deep learning, a value is needed to evaluate the quality of training results, which is obtained through the cost function:

The purpose of training logistic regression model is to have accurate predictions, so the total cost of the cost function should be reduced to the lowest level and be as close to 0 as possible.
4. Propagation backward
Back propagation is to use the label of data for training, so that the error is transmitted from top to bottom, so as to realize the adjustment of the network. This step is an effective way to ensure that the overall network can output the optimal solution and is a process of supervision and training. Specifically, the parameters and for each layer are updated using gradient descent method.
5. Repeat steps (1) to (4)
(3) Introduction to YoloV3+DarkNet Method
YOLO: As an improved CNN, Yolo algorithm no longer uses the traditional window sliding to identify features, but directly divides the original image into non-overlapping small squares, and finally produces feature maps of the same size through convolution. Each element of the feature map is also a small square corresponding to the original image, and each element is then used to predict the target of those centers within that small square. From the picture, the FPS of Yolo network is very high, which means the response time of this method is much lower compared with other tradition convolutional neural network, so it is suitable for real-time detection.
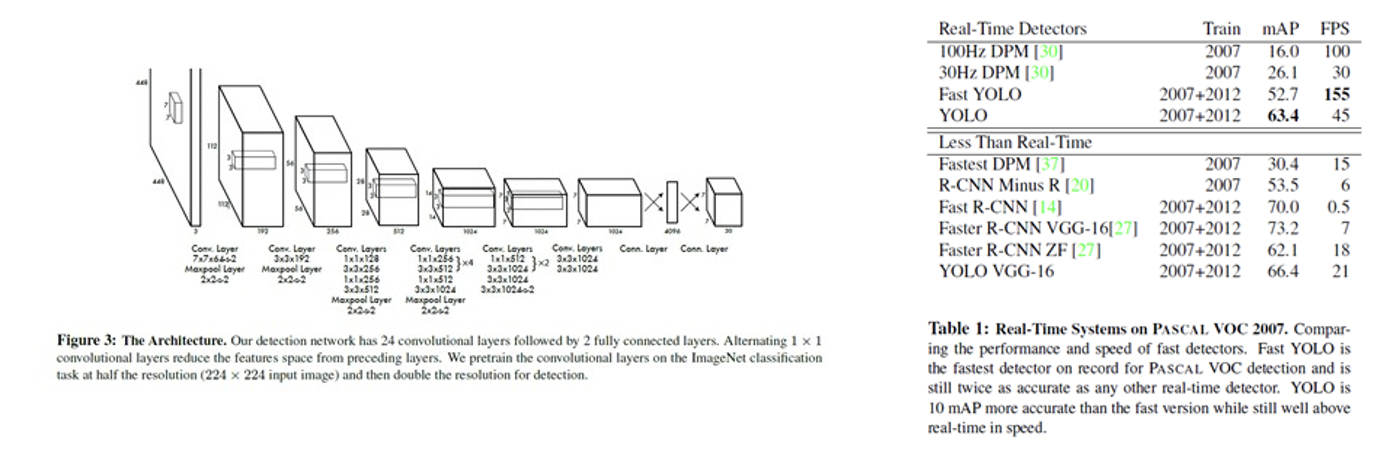
Structure and Performance of Yolov3
More detail shows on this paper.
https://arxiv.org/abs/1506.02640
Darknet: This package is to use Yolo in ROS for real-time object detection system. More detail shows on its Github.
(4) Implement
1. Code download
Github: https://github.com/leggedrobotics/darknet_ros
Command:
- mkdir -p catkin_workspace/src
- cd catkin_workspace/src
- git clone –recursive git@github.com:leggedrobotics/darknet_ros.git
- cd ../
2. Compile
In the ROS workspace directory, execute the following command:
- catkin_make -DCMAKE_BUILD_TYPE=Release
The entire project is compiled at this point, the program will check if yolov2-tiny.weightsand yolov3.weights are available in {catkin_ws}/darknet_ros/darknet_ros/yolo_network_config/weights. The default downloaded code does not include these two model files to save volume, so the model files will automatically start downloading after compilation.
3. Running
(1) Image topic release
Because Darknet_ROS will directly subscribe to the specified image topic name, and then inspect the image, draw the detection box, and publish the corresponding detection topic, we first need to find a ROS package that can publish the image topic. Here we recommend using the ROS official USB_CAM driver package. You can directly post the images captured by the computer’s own camera or USB camera connected to the computer as the ROS image topic.
Download the camera driver:
- sudo apt-get install ros-kinetic-usb-cam
Then publish the camera image topic:
- roslaunch usb_cam usb_cam-test.launch
You should be able to see the actual image display if there are no errors.
Note: most camera’s output is mjpeg,so we should change the launch document.
(2) Run darknet_ros
Darknet_ros is then executed for detection, and the configuration file needs to be changed before running the detection so that the topics subscribed to by Darknet_ROScorrespond to the image topics published by USB_CAM.
Open the darknet_ros/config/ros.yaml file and modify:
- source devel/setup.bash
- roslaunch darknet_ros darknet_ros.launch
The result shows as follows. We can see our program detect the object successfully, and the the green square which means the position of the coke can is very accurate. The position information with high accuracy will promise the success of the robot arm’s moving and grasping. However, we can also see that the FPS is very low actually, which means the program need a very long time to process the image and cannot output its result in time. In the conclusion before, we can believe this is not the problem of the algorithm itself, so the reason is that the hardware is not powerful enough. Because this method will retrain the network every time we run this program, so it need many hardware resources. Because we just use Jetson Nano here, this method is not very practical. To use this, people can try Jetson TX instead.

Object Detection Result

Topic Graph of this Method
1. Execute planned path in real robot arm(armbot)
2. Use Arduino to subscribe Joint state topic in ROS
3. Joint calibration of depth camera and robot arm
4. Training own CNN model and implement in ROS
5. Communication between camera and robot arm


© 2025 Duke MEMS: Experiment Design and Research Methods
Theme by Anders Noren — Up ↑