

A Raspberry Pi is a single board computer that is widely used in many applications. It’s hardware is capable of hosting an entire operating system given that it runs them on a computing architecture with reduced instruction sets (ARM computer architecture). With this amount of computational power, the Pi can be used in a wide variety of applications such as hosting a server, simulating another device, or running complex algorithms for a separate machine. The Pi can even be run as a sand alone computer. The Pi has a number of usb ports for connecting a mouse and keyboard as well as an HDMI port to allow connection with a monitor. There are many reasons you may want to begin playing around with a Raspberry Pi, and by the end of this tutorial you will hopefully have a good starting point to do so.

The NVIDIA Jetson Nano is another ARM device developed by NVIDIA. It has many of the same features as the Raspberry Pi including the GPIO(general purpose input output) pins that allow you to directly access hardware on the board. Though it can perform a wide variety of tasks for a wide variety of applications, the Jetson is specifically designed for machine learning and neural network training and testing. Because of this, NVIDIA have developed their own version of the Ubuntu Linux operating system for the Jetson (though you are free to boot any operating system you like on it), as well as a vast library of pre-trained neural networks for you to download and experiment with. The process for setting up the Jetson nano is essentially the same as that of the Pi with a few small differences which will be covered.
Formating the SD Card
You will need yournew SD card for this portion. Both the Jetson and the Raspberry
Pi use an SD card as their boot drives, so in order to load the desired OS onto either device you will need to flash the OS to an SD card and load it into the designated slot. Before you can flash anything to the SD card, however, you will need to verify that it is formatted correctly. “Formatting the SD” card is the technical way of saying that we need to erase anything that’s currently on it, though the process behind formatting is a bit more complex than simply moving all the files stored on the card to the trash bin. Were you to try and clear the SD card by deleting the files from your computer, you would find that there is more data on the card than what you can see simply examining the files.Deleting the files can actually leave behinda large amount of data on the card. This is why you will need to the formatter to ensure that your card is completely cleared.
For Mac:
If you’re on Mac, then you actually don’t need to install a separate piece of software to format your SD card. MacOS comes with its own built in disk utility that allows you to manage and erase external hard drives. To access it, go to your “Finder” and navigate to your “Applications” folder. From there, go to the folder labeled “Utilities” and find the app called “Disk Utility”. Connect your SD card to your computer and it should be displayed under your “External” drives (Be extra carful here! The Disk Utility also gives your access to your internal drives. You DO NOT want to mess with any of your “Internal” drives as this is what your computer’s OS runs on).

Select the external drive you just connected to and hit the “Erase” button at the top of the window.

You will then be prompted to rename the SD card if you want, but this isn’t necessary. Select “Ok” and the utility should format the disk for you. Once this is complete, you can move on to the next step!
For Windows:
If you are on Windows, you will need to download external software to format your SD card (Download is linked above by SD card formatter). Once you’ve downloaded the SD Card Formatter software, open it and you should see the window pop up with your SD card selected (assuming you only have one external disk connected).

Quick format is selected by default and should work fine on new SD cards. It should also work for cards that have already been flashed but If you run into issues, the overwrite format can be used as well. Once the card has been formatted you are ready to flash your OS to it.
Flashing Operating System
BalenaEtcher (Download linked above) will allow you to flash any disk image of your choice to an external drive and is often used for setting up SD cards for Raspberry Pi’s. The disk image you choose will determine what OS your device runs. For this tutorial, you will flash Ubuntu 20.04 ARM64 image on the Pi and the NVIDIA jetpack image on the Jetson (NVIDIA has different images depending on which kit you have). The flashing process is the same for both, but be sure you chose the correct image for your device. Once you have the correct image, open up balenaEtcher.

Select the disk image you download and your SD card as the target, then hit flash. This process may take several minutes. Once the flash is complete, balenaEtcher will automatically eject you SD card so you can remove it safely. Your SD card is now ready to be loaded onto your device!
Booting Your Device
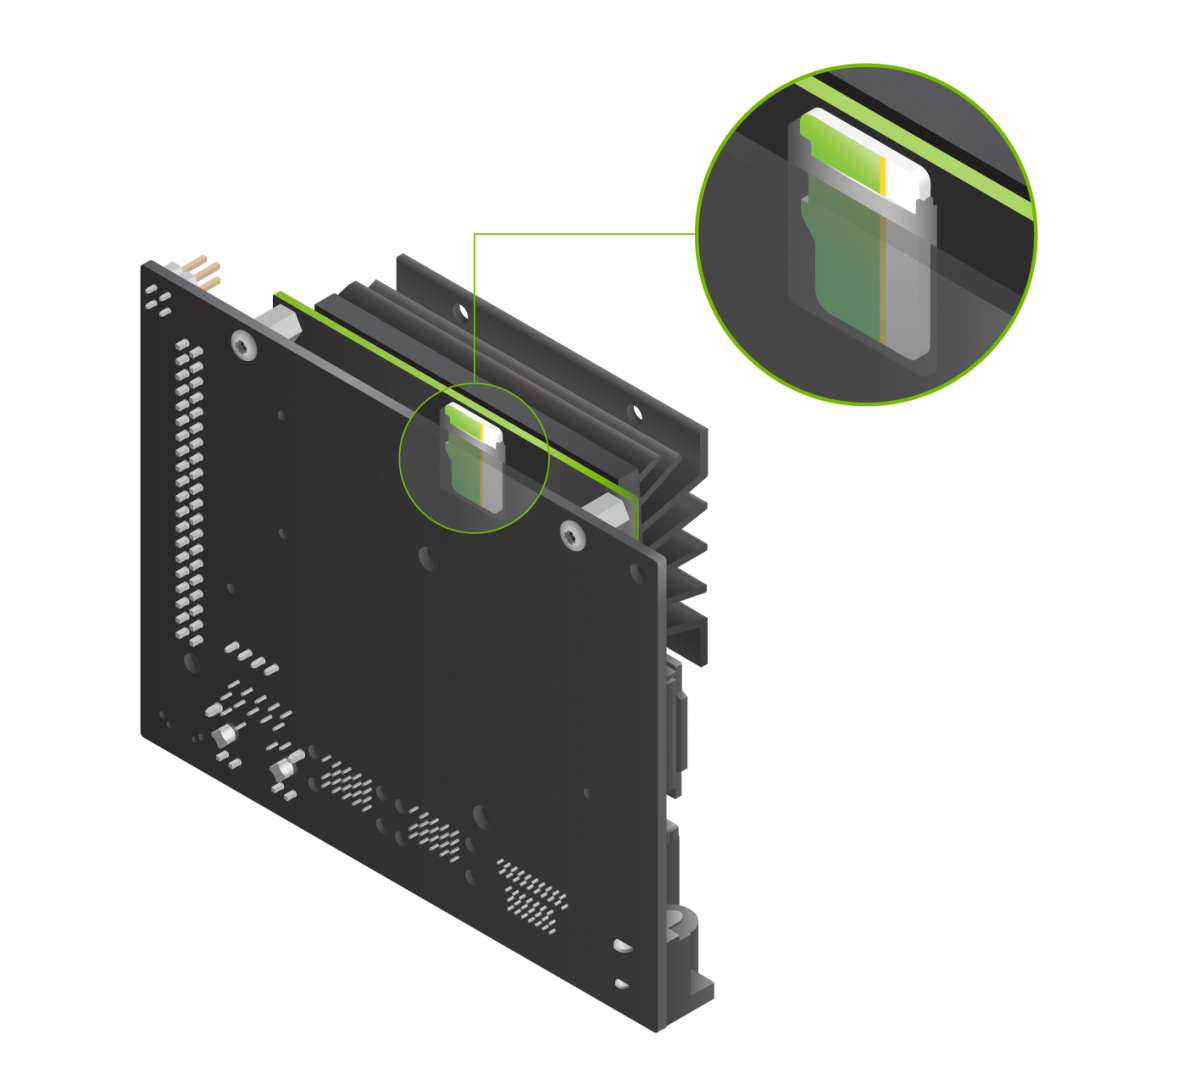
Take your flashed micro SD and insert it the SD slot on your Pi or Jetson with the metal nodes facing board (the cards should be designed so that they cannot be inserted incorrectly).
Pi:

Jetson:
You are now ready to connect your mouse, keyboard, and monitor to your device. Once you’ve connected these, plug in the board to power using the USBC cable. The device should turn on and begin to boot. Now simply follow the instructions and your new one board computer will be ready for use!