/*
* Arduino ROSserial PWM control w/ Encoders and disableable PID controller
* Authored by Emi Muranaka (eem41) w/ help from and advisement from Richard Hall (rah75)
* Derived from https://github.com/JeelChatrola/Control-of-motor-with-ROS
*/
#include <ros.h>
#include <ros/time.h>
#include <std_msgs/Int16.h>
#include <std_msgs/Int32.h>
#include <std_msgs/Float64.h>
#include <Encoder.h>
#include <PID_v1.h>
// arduino hardware pins
#define PIN_MOTOR_L_DIR_1 8
#define PIN_MOTOR_L_DIR_2 7
#define PIN_MOTOR_L_ENA 9
#define PIN_MOTOR_R_DIR_1 4
#define PIN_MOTOR_R_DIR_2 5
#define PIN_MOTOR_R_ENB 3
#define PIN_ENCODER_L_1 18
#define PIN_ENCODER_L_2 19
#define PIN_ENCODER_R_1 20
#define PIN_ENCODER_R_2 21
#define VELOCITY_CONSTANT 48 // Converts ticks/us to mm/s
#define VELOCITY_BUFFER_SIZE 10
typedef enum {SIDE_L = 0, SIDE_R = 1} side_t;
/** A left and right encoder object attached to each wheel */
Encoder encoder [2] = {
Encoder(PIN_ENCODER_L_1, PIN_ENCODER_L_2),
Encoder(PIN_ENCODER_R_1, PIN_ENCODER_R_2)};
/** PID function that controls to a set velocity (left side and right side) */
double Setpoint_L, Input_L, Output_L;
double Kp_L=2, Ki_L=5, Kd_L=1;
PID velPID_L(&Input_L, &Output_L, &Setpoint_L, Kp_L, Ki_L, Kd_L, DIRECT);
double Setpoint_R, Input_R, Output_R;
double Kp_R=2, Ki_R=5, Kd_R=1;
PID velPID_R(&Input_R, &Output_R, &Setpoint_R, Kp_R, Ki_R, Kd_R, DIRECT);
/** Function that controls the variables: motor(0 ou 1), direction (cw ou ccw) e pwm (entra 0 e 255) */
void writeToMotor(const side_t motor_side, const int16_t pwm);
/** ISRs called when the corresponding PWM is set */
void pwmInputL(const std_msgs::Int16& pwmVaL);
void pwmInputR(const std_msgs::Int16& pwmVal);
uint8_t motor_vel_buff_idx [2] = {0,0};
float motor_vel_buff [2][VELOCITY_BUFFER_SIZE];
/** Set velocity setpoint declared by user that implements PID controller */
void velInputL(const std_msgs::Float64& vel_msg);
void velInputR(const std_msgs::Float64& vel_msg);
/** Read and save the encoder values and compute the motor velocity */
void computeEncoderAndVel();
float computeAverageVal(float * buf, const uint8_t len);
//creates Arduino as new ROS NODE
ros::NodeHandle ros_node_handle;
/** Subscribe to PWM values */
ros::Subscriber<std_msgs::Int16> motor_pwm [2] = {
ros::Subscriber<std_msgs::Int16>(“/robot_0/left_wheel/pwm_input”, &pwmInputL),
ros::Subscriber<std_msgs::Int16>(“/robot_0/right_wheel/pwm_input”, &pwmInputR)};
/** Subscribe to Velocity values */
ros::Subscriber<std_msgs::Float64> desired_motor_vel [2] = {
ros::Subscriber<std_msgs::Float64>(“/robot_0/left_wheel/vel_input”, &velInputL),
ros::Subscriber<std_msgs::Float64>(“/robot_0/right_wheel/vel_input”, &velInputR)};
/** Publish encoder values */
std_msgs::Int32 encoder_val [2];
ros::Publisher encoder_pub [2] = {
ros::Publisher(“/robot_0/left_wheel/encoder”, &encoder_val[SIDE_L]),
ros::Publisher(“/robot_0/right_wheel/encoder”, &encoder_val[SIDE_R])};
/** Publish motor velocities */
std_msgs::Float64 motor_vel [2];
ros::Publisher motor_vel_pub [2] = {
ros::Publisher(“/robot_0/left_wheel/vel”, &motor_vel[SIDE_L]),
ros::Publisher(“/robot_0/right_wheel/vel”, &motor_vel[SIDE_R])};
bool velocity_set = false;
int16_t pwm_vals [2] = {0,0};
float vel_desired [2] = {0.0,0.0};
void setup(){
ros_node_handle.initNode();
for (int s = SIDE_L; s <= SIDE_R; s++){
ros_node_handle.advertise(encoder_pub[s]);
ros_node_handle.advertise(motor_vel_pub[s]);
ros_node_handle.subscribe(motor_pwm[s]);
ros_node_handle.subscribe(desired_motor_vel[s]);
}
// Set up PID
Input_L = motor_vel[SIDE_L].data;
Input_R = motor_vel[SIDE_R].data;
velPID_L.SetOutputLimits(-255, 255); // Set limits for PID return value to match PWM to motor
velPID_R.SetOutputLimits(-255, 255);
velPID_L.SetMode(AUTOMATIC); // Turn PID on
velPID_R.SetMode(AUTOMATIC);
// Set up pins
pinMode(PIN_MOTOR_L_DIR_1, OUTPUT);
pinMode(PIN_MOTOR_L_DIR_2, OUTPUT);
pinMode(PIN_MOTOR_L_ENA, OUTPUT);
pinMode(PIN_MOTOR_R_DIR_1, OUTPUT);
pinMode(PIN_MOTOR_R_DIR_2, OUTPUT);
pinMode(PIN_MOTOR_R_ENB, OUTPUT);
}
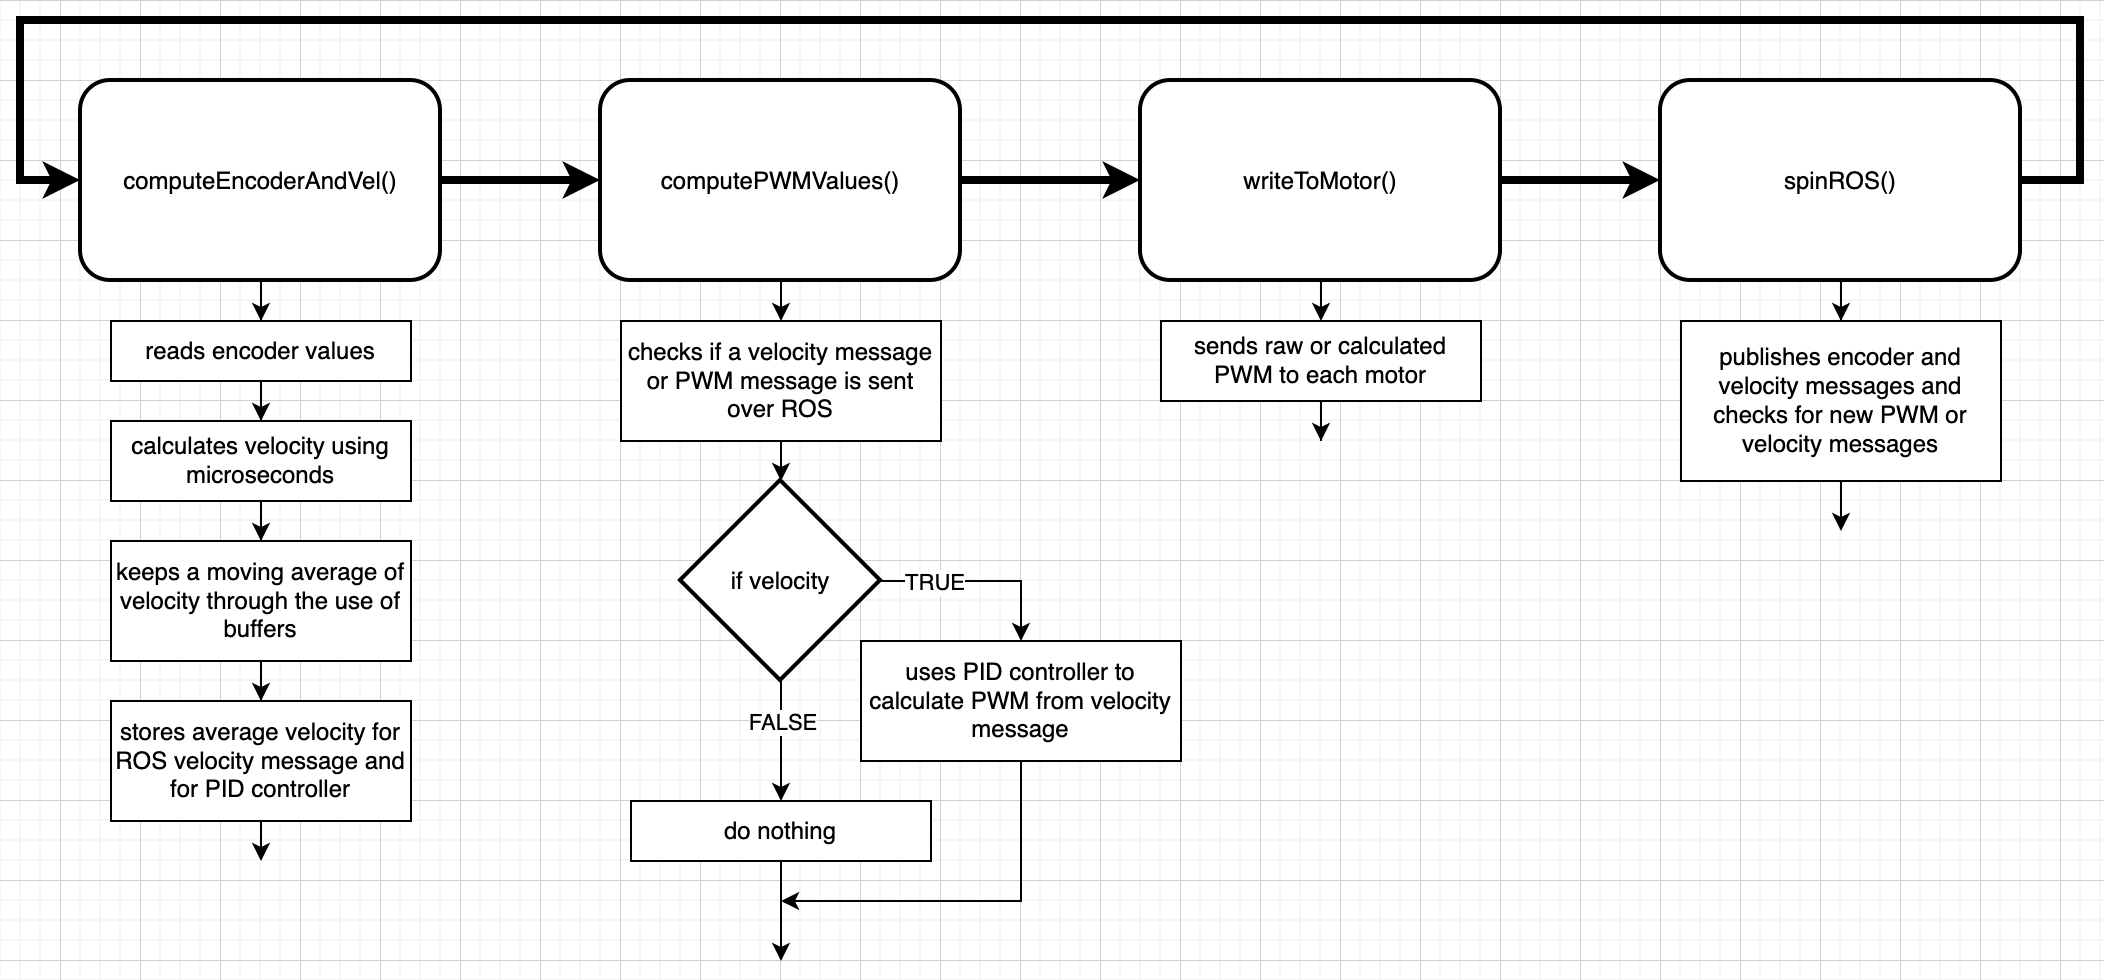
void loop(){
computeEncoderAndVel(); // Reads sensor data and computes velocity of each wheel
if(velocity_set){
// Compute PWM needed to track velocity setpoints (if velocity has been set)
computePWMValues();
}
writeToMotor();
encoder_pub[SIDE_L].publish(&encoder_val[SIDE_L]);
encoder_pub[SIDE_R].publish(&encoder_val[SIDE_R]);
motor_vel_pub[SIDE_L].publish(&motor_vel[SIDE_R]);
motor_vel_pub[SIDE_R].publish(&motor_vel[SIDE_R]);
ros_node_handle.spinOnce();
delay(10); //changed from 10ms to help processing
}
void computePWMValues(){
// Compute PWM values using PID controller and velocity error
Input_L = motor_vel[SIDE_L].data;
Input_R = motor_vel[SIDE_R].data;
Setpoint_L = double(vel_desired[SIDE_L]);
Setpoint_R = double(vel_desired[SIDE_R]);
velPID_L.Compute();
velPID_R.Compute();
pwm_vals[SIDE_L] = Output_L;
pwm_vals[SIDE_R] = Output_R;
}
void writeToMotor(){
for(int motor_side = 0; motor_side<2; motor_side++){
const uint8_t dir1 = (motor_side == SIDE_L ? PIN_MOTOR_L_DIR_1 : PIN_MOTOR_R_DIR_1);
const uint8_t dir2 = (motor_side == SIDE_L ? PIN_MOTOR_L_DIR_2 : PIN_MOTOR_R_DIR_2);
const uint8_t motor_pin = (motor_side == SIDE_L ? PIN_MOTOR_L_ENA : PIN_MOTOR_R_ENB);
if(pwm_vals[motor_side] < 0)
{
digitalWrite(dir1, LOW);
digitalWrite(dir2, HIGH);
}
else
{
digitalWrite(dir1, HIGH);
digitalWrite(dir2, LOW);
}
analogWrite(motor_pin, abs(pwm_vals[motor_side]));
}
}
void pwmInputR(const std_msgs::Int16& pwm_val_msg){
//motorGo(SIDE_R, pwm_val_msg.data);
pwm_vals[SIDE_R] = pwm_val_msg.data;
velocity_set = false;
}
void pwmInputL(const std_msgs::Int16& pwm_val_msg){
//motorGo(SIDE_L, pwm_val_msg.data);
pwm_vals[SIDE_L] = pwm_val_msg.data;
velocity_set = false;
}
void velInputL(const std_msgs::Float64& vel_msg){
//motorGo(SIDE_R, vel_msg.data);
vel_desired[SIDE_L] = vel_msg.data;
velocity_set = true;
}
void velInputR(const std_msgs::Float64& vel_msg){
//motorGo(SIDE_L, vel_msg.data);
vel_desired[SIDE_R] = vel_msg.data;
velocity_set = true;
}
long lastLoopTime_us = 0;
/** Read and save the encoder values and compute the motor velocity */
void computeEncoderAndVel(){
// Read new encoder values
const int32_t new_enc_data [2] = {encoder[SIDE_L].read(), encoder[SIDE_R].read()};
const long delta_time = micros() – lastLoopTime_us;
const float delta_time_f = delta_time;
// Compute velocity and store in velocity buffers
motor_vel_buff[SIDE_L][motor_vel_buff_idx[SIDE_L]] = VELOCITY_CONSTANT * (new_enc_data[SIDE_L] – encoder_val[SIDE_L].data)/delta_time_f;
motor_vel_buff[SIDE_R][motor_vel_buff_idx[SIDE_R]] = VELOCITY_CONSTANT * (new_enc_data[SIDE_R] – encoder_val[SIDE_R].data)/delta_time_f;
// Increment velocity buffer indicies
motor_vel_buff_idx[SIDE_L] = (motor_vel_buff_idx[SIDE_L]+1)%VELOCITY_BUFFER_SIZE;
motor_vel_buff_idx[SIDE_R] = (motor_vel_buff_idx[SIDE_R]+1)%VELOCITY_BUFFER_SIZE;
// Store average velocities in ROS msgs
motor_vel[SIDE_L].data = computeAverageVal(motor_vel_buff[SIDE_L], VELOCITY_BUFFER_SIZE); // mm/s
motor_vel[SIDE_R].data = computeAverageVal(motor_vel_buff[SIDE_R], VELOCITY_BUFFER_SIZE); // mm/s
// Store new encoder values
encoder_val[SIDE_L].data = new_enc_data[SIDE_L];
encoder_val[SIDE_R].data = new_enc_data[SIDE_R];
lastLoopTime_us += delta_time;
}
float computeAverageVal(float * buf, const uint8_t len){
float val = 0;
for (uint8_t i = 0; i < len; i++){
val += buf[i];
}
return val/len;
}