In this page, you would develop basic knowledge about teleoperation and get to know the software and hardware required to achieve it.  Hopefully, it will help you start your own project in an easier way.

Why Teleoperation?

Remote operation of equipment and robots is the need of the hour and the field responsible to define the “language, grammar and method” of communication is called teleoperation.

Engineering education has undergone profound change during the Covid-19 pandemic. The campuses have turned to learn virtually. As for the engineering students, what is used to be hands-on education has been turned into remote practice. 

Overall Structure

Controlling the robot remotely requires us to use services that can capture our commands, and then at the same time, relay them to the receiver’s end. 

The whole process requires :

  • hardware to connect to the internet on receiver and transmitter end
  • service to allow the hardware to send the commands
Here, the Arduino + WiFi Module+ Receiving device will constitute the hardware alongside.
 

MQTT Broker + Cloud will be the service part

Example Solution : ESP32 + AWS

Following we will introduce AWS(service) and ESP32(hardware), which is one way using IoT to achieve teleoperation

AWS IoT Core

IoT Core

Amazon Web Services(AWS) is a comprehensive cloud computing platform provided by Amazon. [1]

The one services we are using to achieve teleoperation is AWS IoT core, which lets connected devices easily and securely interact with cloud applications and other devices

For further reading, check out the official page on “What is AWS IoT” here

  • MQTT: MQTT is a lightweight pub/sub protocol, designed to minimize network bandwidth and device resource requirements
  • Rule Engine: The Rules Engine enables continuous processing of inbound data from devices connected to AWS IoT Core.
  • Device Gateway:  The Device Gateway forms the backbone of communication between connected devices and the cloud capabilities such as the Rules Engine, Device Shadow, and other AWS and 3rd-party services[2].

Devices connect to AWS IoT Core over HTTPS, Websockets, or secure MQTT, which allowes secure, bi-directional communication

AWS IoT contains a Rules Engine which enable continuous processing of data sent by connect devices

There is a Registry where you can register or keep track of devices connected to AWS IoT Core.[2]

In order to connect devices to Amazon web services IoT, the first step should set up the  AWS IoT. Followings are the main steps to set up AWS IoT.

  •  Configure AWS account
  • Creat a new thing
  • Generate the security certificates
  • Define and Attach policies

As we succesfully setting up AWS, we can test it using the MQTT.fx borker tool 

You can find all the details in here

Check out this article from AWS on how AWS IoT works in detail, here .

  • This document walks us through the terminologies and brief description of different features of the services that are there to be offered in AWS IoT.
  • Gives a good understanding of the cloud infrastructure and how they all work.


Suggested training: AWS IoT Telemetry Fundamentals

WiFi Module_ESP32

ESP32

ESP32 is a series of low-cost, low-power system on a chip microcontrollers with integrated Wi-Fi and Bluetooth.[3]

  • Station Mode

Station(STA) mode is used to connect the ESP32 module to a Wi-Fi network established  by an access point.

  • AP Mode

The ESP32 module is used as an access point to establish a Wi-Fi network for other devices to connect in.


  • Download Arduino IDE here
  • Add ESP32 board to the Arduino IDE  

Connection to the network  only requires two steps:

  • Reference WiFi library;

#include

  • Connect to the network;

WiFi.begin(ssid, password);

Here is the sample code link 

There are only two steps to establishing a network:

  • Reference WiFi library;

#include

  • Start the AP network;

WiFi.softAP(ssid)

Here is the sample code link 

In this sample, you can learn how to using ESP32 to control 28BYJ-48 Stepper motor over WiFi using HTTP protocol.

Here is the video link

Here is the code link  

Follow the detailed example here to create a webserver through Arduino IDE and control LEDs connected to ESP32.

Connect ESP32 with AWS

  • Download the AWS IOT library for Arduino ESP32 from this link
  • WiFi SSID, Host Address Configuration
  • AWS Certificate Configuration

View detail from this link

In this section, you can learn how to connect to AWS and successfully publish and subscribe a topic. 

Now, it will be wise to read about Policies, Certificates , Publish and Subscribe using different programming languages and platform to control an LED. Check here.

This sample, you will use a DHT11 sensor and “Publish” the sensor data to your AWS server. 

MQTT stands for Message Queuing Telemetry Transport and is a lightweight messanging protocol for sensors and devices to communicate with each other.

Read the best practices, here and more about Publish and Subscribe, here.

Sample project

Remote Stepper Motor Control.

In this project, we developed a method to activate the motor through the AWS  cloud. followings are the video and code.

Play Video

Here, Person X (in India)  needs to send a command to Person Y (in China) where the stepper motor will react based on the command. 

The challenge is to figure out a secure way of sending the command and fetching by the receiving end without disconnecting.

Another challenge is to make sure the Arduino code is able to capture the instruction from cloud server and process it.

In case people do not have a AWS account but still want to control the motor by sending a command, they can use MQTT.fx software which is setup using the receiver’s AWS account information.

The receiver( Person Y) needs to share:

  • 3 certificate files
  • Host ID, with Person X.

It is not the most secure method as the “Host ID” should not be shared but it works for now if you trust the person in the same organization. We are working on figuring out an alternative.

Now we create 2 topics, say, t1 and t2.

  • MQTT.fx —> Publish to —> t1
  • t2—> Subscribe to —> t1
  • Arduino IDE(Person Y, receiver) —-> Subscribed to —> t2

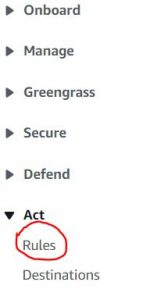
This way we can filter the messages being passed based on our requirement and 1 topic can have multiple subscribers. The “rule based” topic creation can be done under “Rules” section of “Act”.

Download the code from here

Alternate Methods for Teleoperability

Besides using AWS and ESP32, there are also many other ways to achieve teleoperation

Mesh Network

Mesh network is a local area connection where the nodes, like bridges, switches and other infrastructure devices (redistribution point or communication endpoint) connect dynamically, directly and non-hierarchically to as many other nodes as possible[4].

  • Nodes: Devices that communicate with each other by sending and receiving information.
  • Gateway: Linker of nodes & the internet. Talks with both the nodes and the internet
  • Repeaters: Devices maintaining internet signals. Extends the internet transmission to long distance
  • End-point: Only sends information to other nodes. One way transaction. Getting replaced by nodes.
  • Flooding: Everyone is connected with everyone else. 


  • Routing: Chooses one path from node to node and transfers directly to the destination through that path. 
  • Suited for smaller data transfer like logs and diagnostic files from sensors but not for video sized data transfer. 


  • Higher the network frequency, faster the data transfer and shorter the range.

Pros:

  • Ability to self-organize and self-configure
  • Reduced overhead cost
  • Chances of network failure reduced on crash of few nodes due to dynamic redistribution of workload

Cons:

  • Lack of common standard leading to reduced interoperability between devices 

Particle Xenon

Xenon:

  • Mesh +Bluetooth
  • Can communicate amongst each other
  • Can help extend the range but cannot connect to WiFi
  • Can also be used without a gateway
  • Mesh only device
  • Can connect it to the internet ysing Adafruit’s Ethenet Featherwing. It can be added over the Xenon given the similar from factor and connected with a LAN connection

You would learn an example to better understanding Xenon.

Detail please read Link

Particle Argon

Particle Argon

Particle: Particle builds IoT stuff for people and gives mesh capabilities

Argon: WiFi+Mesh+Bluetooth

  • Has to use an external antenna for WiFi
  • Onboard antenna is for mesh only
  • Can connect to networks and Xenon boards can be used to extend the networks


  • Blinking an LED Code: Link.
  • Controlling an LED over Internet: Link
  • Connecting two particle boards over the internet: Link

Future work

Here are some thoughts that could develop in the future

  • By sending positon commands to AWS cloud to control Alphabot. 
  •  Design a web-based control of the robotic arm using AWS and ESP32.

Reference

[1] https://en.wikipedia.org/wiki/Teleoperation (Last visited: 11/24/20)

[2] AWS IoT Core FAQs – Amazon Web Services (amazonaws-china.com) (Last visited: 11/24/20)

[3] https://en.wikipedia.org/wiki/ESP32 (Last visited: 11/24/20)

[4] https://en.wikipedia.org/wiki/Mesh_networking (Last visited: 6/19/20)

Author information

This page is made by Jiajun Cui and Ravi Prakash in Fall 2020. Both are Master of Science students in mechanical engineering program of Thomas Lord Department of Mechanical Engineering and Materials Science, Duke University.

If you have any advise, please contact professor George Delagrammatikas: gd87@duke.edu