Introduction
Many of you might have heard of or use Arduino, but for those of you who have not, the website will guide you with getting started with Arduino and mastering it.
The goal is to train student with arduino programming from the basic level to more advanced techniques, and hardware skills with Arduino board and robotics applications

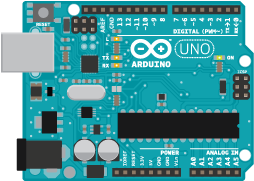
Background
Arduino is an open source physical computing platform based on a simple input/output (I/O) board and a development environment that implements the Processing language (www.processing.org).
Arduino can be used to develop standalone interactive objects or can be connected to software on your computer (such as Flash, Processing, VVVV, or Max/MSP).
The boards can be assembled by hand or purchased preassembled; the open source IDE (Integrated Development Environment) can be downloaded for free from www.arduino.cc
Arduino is different from other platforms on the market because of these features:
- It is a multiplatform environment; it can run on Windows, Macintosh, and Linux.
- It is based on the Processing programming IDE, an easy-to-use development environment used by artists and designers.
- You program it via a USB cable, not a serial port. This feature is useful, because many modern computers don’t have serial ports.
- It is open source hardware and software—if you wish, you can download the circuit diagram, buy all the components, and make your own, without paying anything to the makers of Arduino.
- The hardware is cheap. The USB board costs about $35 and replacing a burnt-out chip on the board is easy and costs no more than $4. So you can afford to make mistakes.
- There is an active community of users, so there are plenty of people who can help you.
- The Arduino Project was developed in an educational environment and is therefore great for newcomers to get things working quickly.
Exercises
This section consists of 6 exercises with increasing difficulties. The first three are designed to practice students with common Arduino library, functions, loops, etc. Then student is capable of understanding the principle of C++ programming language and looking up necessary resources based on their need. They should also know basic pin connections in Arduino.
The next three excercises are therefore project based. The students need to explore external libraries, use various functions, and make more complicated wire connections.
Write the code to blink 6 LEDs attached to the Arduino by using a for() loop to cycle back and forth through digital pins 2-7.
The LEDS are turned on and off, in sequence, by using both the digitalWrite() and delay() functions.
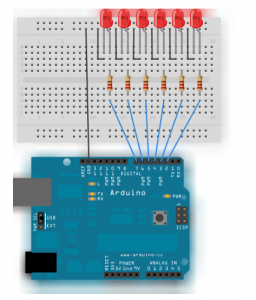
Write a code to turn on each LED in turn. (Use max 14 LED. The solutions is for 14 LED.)
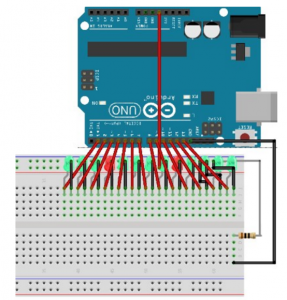
Use while loop to calibrate the value of an analog sensor.

While a button attached to digital pin 2 is pressed, the program runs a method called calibrate() that looks for the highest and lowest values of the analog sensor. When you release the button, the sketch continues with the main loop.(You need to write the calibrate yourself.)

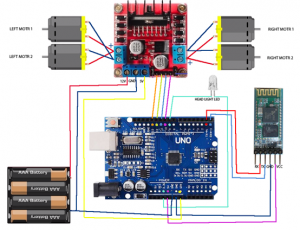
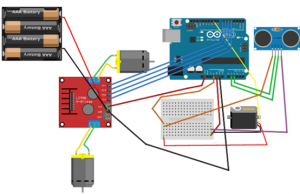
Setup for pins >> Serial connection >> Rotate the motors in 4 directions
First, you need to include  and  library.

Then define the sensor pings and design the reaction of the car to obstacle (for example, go back, look right, look left, and go to the clear area.) Lastly, Design the path if both sides are clear.
First, calibrate the accelerometer: Read the value from x, y and z in mV when there are no inputs. This is the zero g (9.8m/s^2) reading for each pin.
Given that the accelerometer has sensitivity of 330mV/g, come up with the conversion to real acceleration.
Print the results.

int timer = 100; // The higher the number, the slower the timing.

void setup() {

// use a for loop to initialize each pin as an output:

for (int thisPin = 2; thisPin < 8; thisPin++) {

pinMode(thisPin, OUTPUT);

}
}

void loop() {

// loop from the lowest pin to the highest:

for (int thisPin = 2; thisPin < 8; thisPin++) { // turn the pin on: digitalWrite(thisPin, HIGH); delay(timer); // turn the pin off: digitalWrite(thisPin, LOW); } // loop from the highest pin to the lowest: for (int thisPin = 7; thisPin >= 2; thisPin--) {

// turn the pin on:

digitalWrite(thisPin, HIGH);

delay(timer);

// turn the pin off:

digitalWrite(thisPin, LOW);

}
}
Void setup(){
for(int i=1; i<14; i=i+1){
pinmode(i,output);
}
}
Void loop(){
for(int i=1; i<14; i=i+1){
digitalWrite(i,HIGH);
delay(200);
digitalWrite(i,low);
}
}
const int sensorPin = A0; // pin that the sensor is attached to

const int ledPin = 9; // pin that the LED is attached to

const int indicatorLedPin = 13; // pin that the built-in LED is attached to

const int buttonPin = 2; // pin that the button is attached to

// These variables will change:
int sensorMin = 1023; // minimum sensor value
int sensorMax = 0; // maximum sensor value
int sensorValue = 0; // the sensor value

void setup() {

// set the LED pins as outputs and the switch pin as input:

pinMode(indicatorLedPin, OUTPUT);

pinMode(ledPin, OUTPUT);

pinMode(buttonPin, INPUT);
}

void loop() {

// while the button is pressed, take calibration readings:

while (digitalRead(buttonPin) == HIGH) {

calibrate();

}

// signal the end of the calibration period

digitalWrite(indicatorLedPin, LOW);

// read the sensor:

sensorValue = analogRead(sensorPin);

// apply the calibration to the sensor reading

sensorValue = map(sensorValue, sensorMin, sensorMax, 0, 255);

// in case the sensor value is outside the range seen during calibration

sensorValue = constrain(sensorValue, 0, 255);

// fade the LED using the calibrated value:

analogWrite(ledPin, sensorValue);
}

void calibrate() {

// turn on the indicator LED to indicate that calibration is happening:

digitalWrite(indicatorLedPin, HIGH);

// read the sensor:

sensorValue = analogRead(sensorPin);

// record the maximum sensor value

if (sensorValue > sensorMax) {

sensorMax = sensorValue;

}

// record the minimum sensor value

if (sensorValue < sensorMin) {

sensorMin = sensorValue;

}
}
char t;

void setup() {
pinMode(13,OUTPUT); //left motors forward
pinMode(12,OUTPUT); //left motors reverse
pinMode(11,OUTPUT); //right motors forward
pinMode(10,OUTPUT); //right motors reverse
pinMode(9,OUTPUT); //Led
Serial.begin(9600);

}

void loop() {
if(Serial.available()){
t = Serial.read();
Serial.println(t);
}

if(t == 'F'){ //move forward(all motors rotate in forward direction)
digitalWrite(13,HIGH);
digitalWrite(11,HIGH);
}

else if(t == 'B'){ //move reverse (all motors rotate in reverse direction)
digitalWrite(12,HIGH);
digitalWrite(10,HIGH);
}

else if(t == 'L'){ //turn right (left side motors rotate in forward direction, right side motors doesn't rotate)
digitalWrite(11,HIGH);
}

else if(t == 'R'){ //turn left (right side motors rotate in forward direction, left side motors doesn't rotate)
digitalWrite(13,HIGH);
}

else if(t == 'W'){ //turn led on or off)
digitalWrite(9,HIGH);
}
else if(t == 'w'){
digitalWrite(9,LOW);
}

else if(t == 'S'){ //STOP (all motors stop)
digitalWrite(13,LOW);
digitalWrite(12,LOW);
digitalWrite(11,LOW);
digitalWrite(10,LOW);
}
delay(100);
}
#include  //standard library for the servo
#include  //for the Ultrasonic sensor function library.

//L298N motor control pins
const int LeftMotorForward = 6;
const int LeftMotorBackward = 7;
const int RightMotorForward = 5;
const int RightMotorBackward = 4;

//sensor pins
#define trig_pin A1 //analog input 1
#define echo_pin A2 //analog input 2

#define maximum_distance 200
boolean goesForward = false;
int distance = 100;

NewPing sonar(trig_pin, echo_pin, maximum_distance); //sensor function
Servo servo_motor;

void setup(){

pinMode(RightMotorForward, OUTPUT);
pinMode(LeftMotorForward, OUTPUT);
pinMode(LeftMotorBackward, OUTPUT);
pinMode(RightMotorBackward, OUTPUT);

servo_motor.attach(9); //our servo pin

servo_motor.write(115);
delay(2000);
distance = readPing();
delay(100);
distance = readPing();
delay(100);
distance = readPing();
delay(100);
distance = readPing();
delay(100);
}

void loop(){

int distanceRight = 0;
int distanceLeft = 0;
delay(50);

if (distance <= 20){ moveStop(); delay(300); moveBackward(); delay(400); moveStop(); delay(300); distanceRight = lookRight(); delay(300); distanceLeft = lookLeft(); delay(300); if (distance >= distanceLeft){
turnRight();
moveStop();
}
else{
turnLeft();
moveStop();
}
}
else{
moveForward();
}
distance = readPing();
}

int lookRight(){
servo_motor.write(50);
delay(500);
int distance = readPing();
delay(100);
servo_motor.write(115);
return distance;
}

int lookLeft(){
servo_motor.write(170);
delay(500);
int distance = readPing();
delay(100);
servo_motor.write(115);
return distance;
delay(100);
}

int readPing(){
delay(70);
int cm = sonar.ping_cm();
if (cm==0){
cm=250;
}
return cm;
}

void moveStop(){

digitalWrite(RightMotorForward, LOW);
digitalWrite(LeftMotorForward, LOW);
digitalWrite(RightMotorBackward, LOW);
digitalWrite(LeftMotorBackward, LOW);
}

void moveForward(){

if(!goesForward){

goesForward=true;

digitalWrite(LeftMotorForward, HIGH);
digitalWrite(RightMotorForward, HIGH);

digitalWrite(LeftMotorBackward, LOW);
digitalWrite(RightMotorBackward, LOW);
}
}

void moveBackward(){

goesForward=false;

digitalWrite(LeftMotorBackward, HIGH);
digitalWrite(RightMotorBackward, HIGH);

digitalWrite(LeftMotorForward, LOW);
digitalWrite(RightMotorForward, LOW);

}

void turnRight(){

digitalWrite(LeftMotorForward, HIGH);
digitalWrite(RightMotorBackward, HIGH);

digitalWrite(LeftMotorBackward, LOW);
digitalWrite(RightMotorForward, LOW);

delay(500);

digitalWrite(LeftMotorForward, HIGH);
digitalWrite(RightMotorForward, HIGH);

digitalWrite(LeftMotorBackward, LOW);
digitalWrite(RightMotorBackward, LOW);

}

void turnLeft(){

digitalWrite(LeftMotorBackward, HIGH);
digitalWrite(RightMotorForward, HIGH);

digitalWrite(LeftMotorForward, LOW);
digitalWrite(RightMotorBackward, LOW);

delay(500);

digitalWrite(LeftMotorForward, HIGH);
digitalWrite(RightMotorForward, HIGH);

digitalWrite(LeftMotorBackward, LOW);
digitalWrite(RightMotorBackward, LOW);
}
const int xpin = A0; // x-axis of the accelerometer
const int ypin = A1; // y-axis
const int zpin = A2; // z-axis
void setup() {
// put your setup code here, to run once:
Serial.begin(9600);
}

void loop() {
// put your main code here, to run repeatedly:
int x = analogRead(xpin); //read from xpin
delay(1); //
int y = analogRead(ypin); //read from ypin
delay(1);
int z = analogRead(zpin); //read from zpin

Serial.print(((float)x-344)/330*9.8);

Serial.print(((float)y-410)/330*9.8);

Serial.print(((float)z-340)/330*9.8);

delay(1000);
}
Write the code to blink 6 LEDs attached to the Arduino by using a for() loop to cycle back and forth through digital pins 2-7. The LEDS are turned on and off, in sequence, by using both the digitalWrite() and delay() functions.

Write a code to turn on each LED in turn. (Use max 14 LED. The solutions is for 14 LED.)

Use while loop to calibrate the value of an analog sensor. While a button attached to digital pin 2 is pressed, the program runs a method called calibrate() that looks for the highest and lowest values of the analog sensor. When you release the button, the sketch continues with the main loop.(You need to write the calibrate yourself.)
Setup for pins >> Serial connection >> Rotate the motors in 4 directions

First, you need to include and library. Then define the sensor pings and design the reaction of the car to obstacle (for example, go back, look right, look left, and go to the clear area.) Lastly, Design the path if both sides are clear.
First, calibrate the accelerometer: Read the value from x, y and z in mV when there are no inputs. This is the zero g (9.8m/s^2) reading for each pin. Given that the accelerometer has sensitivity of 330mV/g, come up with the conversion to real acceleration. Print the results.

int timer = 100; // The higher the number, the slower the timing.
void setup() {
// use a for loop to initialize each pin as an output:
for (int thisPin = 2; thisPin < 8; thisPin++) {
pinMode(thisPin, OUTPUT);
}
}
void loop() {
// loop from the lowest pin to the highest:
for (int thisPin = 2; thisPin < 8; thisPin++) { // turn the pin on: digitalWrite(thisPin, HIGH); delay(timer); // turn the pin off: digitalWrite(thisPin, LOW); } // loop from the highest pin to the lowest: for (int thisPin = 7; thisPin >= 2; thisPin--) {
// turn the pin on:
digitalWrite(thisPin, HIGH);
delay(timer);
// turn the pin off:
digitalWrite(thisPin, LOW);
}
} Void setup(){
for(int i=1; i<14; i=i+1){
pinmode(i,output);
}
}
Void loop(){
for(int i=1; i<14; i=i+1){
digitalWrite(i,HIGH);
delay(200);
digitalWrite(i,low);
}
}
const int sensorPin = A0; // pin that the sensor is attached to
const int ledPin = 9; // pin that the LED is attached to
const int indicatorLedPin = 13; // pin that the built-in LED is attached to
const int buttonPin = 2; // pin that the button is attached to
// These variables will change:
int sensorMin = 1023; // minimum sensor value
int sensorMax = 0; // maximum sensor value
int sensorValue = 0; // the sensor value
void setup() {
// set the LED pins as outputs and the switch pin as input:
pinMode(indicatorLedPin, OUTPUT);
pinMode(ledPin, OUTPUT);
pinMode(buttonPin, INPUT);
}
void loop() {
// while the button is pressed, take calibration readings:
while (digitalRead(buttonPin) == HIGH) {
calibrate();
}
// signal the end of the calibration period
digitalWrite(indicatorLedPin, LOW);
// read the sensor:
sensorValue = analogRead(sensorPin);
// apply the calibration to the sensor reading
sensorValue = map(sensorValue, sensorMin, sensorMax, 0, 255);
// in case the sensor value is outside the range seen during calibration
sensorValue = constrain(sensorValue, 0, 255);
// fade the LED using the calibrated value:
analogWrite(ledPin, sensorValue);
}
void calibrate() {
// turn on the indicator LED to indicate that calibration is happening:
digitalWrite(indicatorLedPin, HIGH);
// read the sensor:
sensorValue = analogRead(sensorPin);
// record the maximum sensor value
if (sensorValue > sensorMax) {
sensorMax = sensorValue;
}
// record the minimum sensor value
if (sensorValue < sensorMin) {
sensorMin = sensorValue;
}
} char t;
void setup() {
pinMode(13,OUTPUT); //left motors forward
pinMode(12,OUTPUT); //left motors reverse
pinMode(11,OUTPUT); //right motors forward
pinMode(10,OUTPUT); //right motors reverse
pinMode(9,OUTPUT); //Led
Serial.begin(9600);
}
void loop() {
if(Serial.available()){
t = Serial.read();
Serial.println(t);
}
if(t == 'F'){ //move forward(all motors rotate in forward direction)
digitalWrite(13,HIGH);
digitalWrite(11,HIGH);
}
else if(t == 'B'){ //move reverse (all motors rotate in reverse direction)
digitalWrite(12,HIGH);
digitalWrite(10,HIGH);
}
else if(t == 'L'){ //turn right (left side motors rotate in forward direction, right side motors doesn't rotate)
digitalWrite(11,HIGH);
}
else if(t == 'R'){ //turn left (right side motors rotate in forward direction, left side motors doesn't rotate)
digitalWrite(13,HIGH);
}
else if(t == 'W'){ //turn led on or off)
digitalWrite(9,HIGH);
}
else if(t == 'w'){
digitalWrite(9,LOW);
}
else if(t == 'S'){ //STOP (all motors stop)
digitalWrite(13,LOW);
digitalWrite(12,LOW);
digitalWrite(11,LOW);
digitalWrite(10,LOW);
}
delay(100);
} #include //standard library for the servo
#include //for the Ultrasonic sensor function library.
//L298N motor control pins
const int LeftMotorForward = 6;
const int LeftMotorBackward = 7;
const int RightMotorForward = 5;
const int RightMotorBackward = 4;
//sensor pins
#define trig_pin A1 //analog input 1
#define echo_pin A2 //analog input 2
#define maximum_distance 200
boolean goesForward = false;
int distance = 100;
NewPing sonar(trig_pin, echo_pin, maximum_distance); //sensor function
Servo servo_motor;
void setup(){
pinMode(RightMotorForward, OUTPUT);
pinMode(LeftMotorForward, OUTPUT);
pinMode(LeftMotorBackward, OUTPUT);
pinMode(RightMotorBackward, OUTPUT);
servo_motor.attach(9); //our servo pin
servo_motor.write(115);
delay(2000);
distance = readPing();
delay(100);
distance = readPing();
delay(100);
distance = readPing();
delay(100);
distance = readPing();
delay(100);
}
void loop(){
int distanceRight = 0;
int distanceLeft = 0;
delay(50);
if (distance <= 20){ moveStop(); delay(300); moveBackward(); delay(400); moveStop(); delay(300); distanceRight = lookRight(); delay(300); distanceLeft = lookLeft(); delay(300); if (distance >= distanceLeft){
turnRight();
moveStop();
}
else{
turnLeft();
moveStop();
}
}
else{
moveForward();
}
distance = readPing();
}
int lookRight(){
servo_motor.write(50);
delay(500);
int distance = readPing();
delay(100);
servo_motor.write(115);
return distance;
}
int lookLeft(){
servo_motor.write(170);
delay(500);
int distance = readPing();
delay(100);
servo_motor.write(115);
return distance;
delay(100);
}
int readPing(){
delay(70);
int cm = sonar.ping_cm();
if (cm==0){
cm=250;
}
return cm;
}
void moveStop(){
digitalWrite(RightMotorForward, LOW);
digitalWrite(LeftMotorForward, LOW);
digitalWrite(RightMotorBackward, LOW);
digitalWrite(LeftMotorBackward, LOW);
}
void moveForward(){
if(!goesForward){
goesForward=true;
digitalWrite(LeftMotorForward, HIGH);
digitalWrite(RightMotorForward, HIGH);
digitalWrite(LeftMotorBackward, LOW);
digitalWrite(RightMotorBackward, LOW);
}
}
void moveBackward(){
goesForward=false;
digitalWrite(LeftMotorBackward, HIGH);
digitalWrite(RightMotorBackward, HIGH);
digitalWrite(LeftMotorForward, LOW);
digitalWrite(RightMotorForward, LOW);
}
void turnRight(){
digitalWrite(LeftMotorForward, HIGH);
digitalWrite(RightMotorBackward, HIGH);
digitalWrite(LeftMotorBackward, LOW);
digitalWrite(RightMotorForward, LOW);
delay(500);
digitalWrite(LeftMotorForward, HIGH);
digitalWrite(RightMotorForward, HIGH);
digitalWrite(LeftMotorBackward, LOW);
digitalWrite(RightMotorBackward, LOW);
}
void turnLeft(){
digitalWrite(LeftMotorBackward, HIGH);
digitalWrite(RightMotorForward, HIGH);
digitalWrite(LeftMotorForward, LOW);
digitalWrite(RightMotorBackward, LOW);
delay(500);
digitalWrite(LeftMotorForward, HIGH);
digitalWrite(RightMotorForward, HIGH);
digitalWrite(LeftMotorBackward, LOW);
digitalWrite(RightMotorBackward, LOW);
} const int xpin = A0; // x-axis of the accelerometer
const int ypin = A1; // y-axis
const int zpin = A2; // z-axis
void setup() {
// put your setup code here, to run once:
Serial.begin(9600);
}
void loop() {
// put your main code here, to run repeatedly:
int x = analogRead(xpin); //read from xpin
delay(1); //
int y = analogRead(ypin); //read from ypin
delay(1);
int z = analogRead(zpin); //read from zpin
Serial.print(((float)x-344)/330*9.8);
Serial.print(((float)y-410)/330*9.8);
Serial.print(((float)z-340)/330*9.8);
delay(1000);
} Challenge
Write the code that would do the calibration of the accelerometer by itself (it will read the zero g value and calibrate based on the value automatically).
Alphabot with accelerometer
The ADXL335 is a complete 3-axis accerleration measurement system. The ADXL335 has a measurement range of ±3 g minimum. It contains a polysilicon surface-micromachined sensor and signal conditioning circuitry to implement an open-loop acceleration measurement architecture. The output signals are analog voltages that are proportional to acceleration.
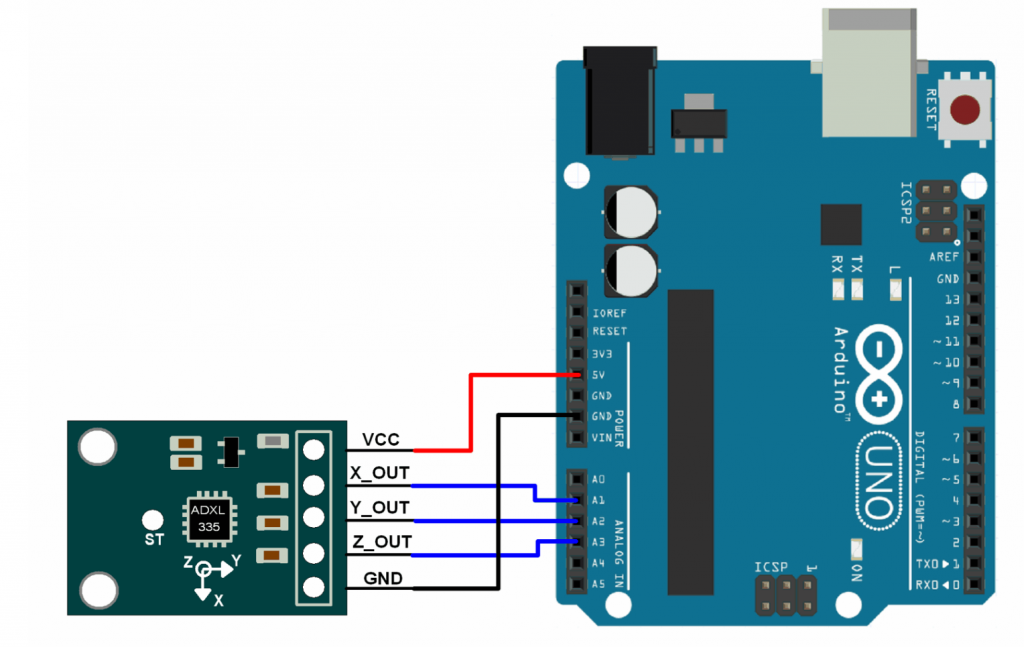
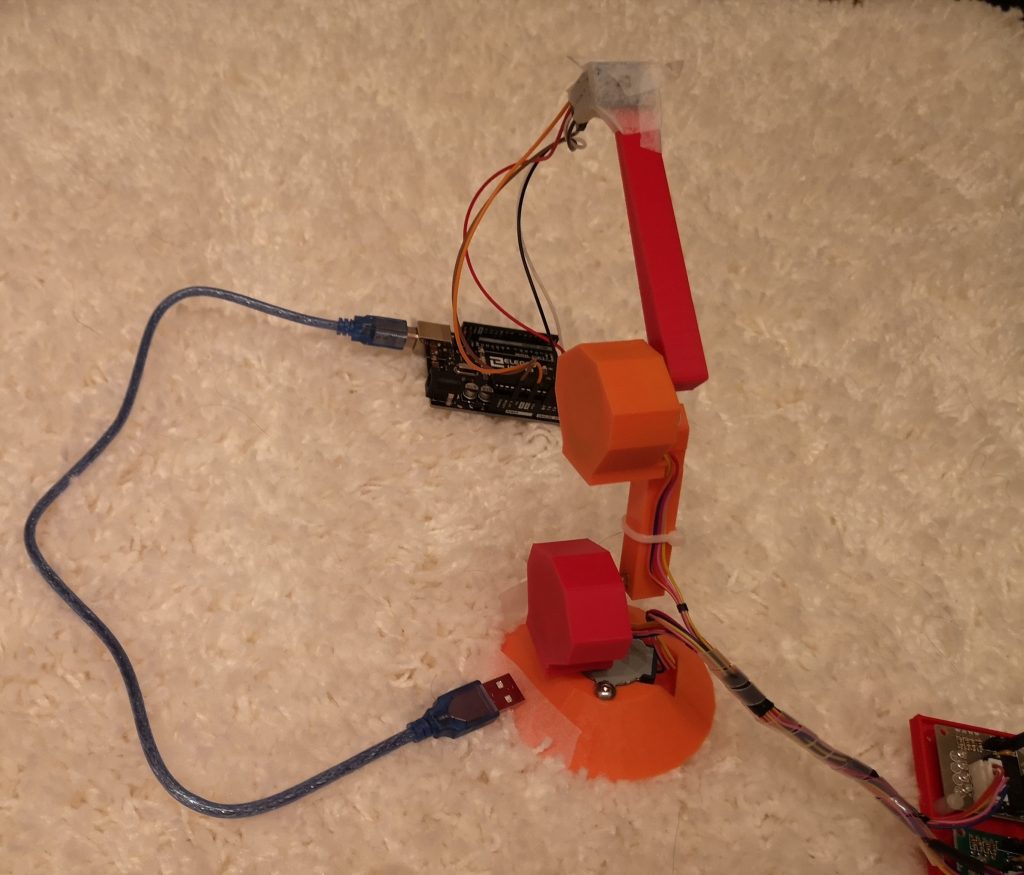
Here we show a the accelerometer pin connections as well as how it is attached to the Alphabot for acceleration reading.
How does accelerometer work?
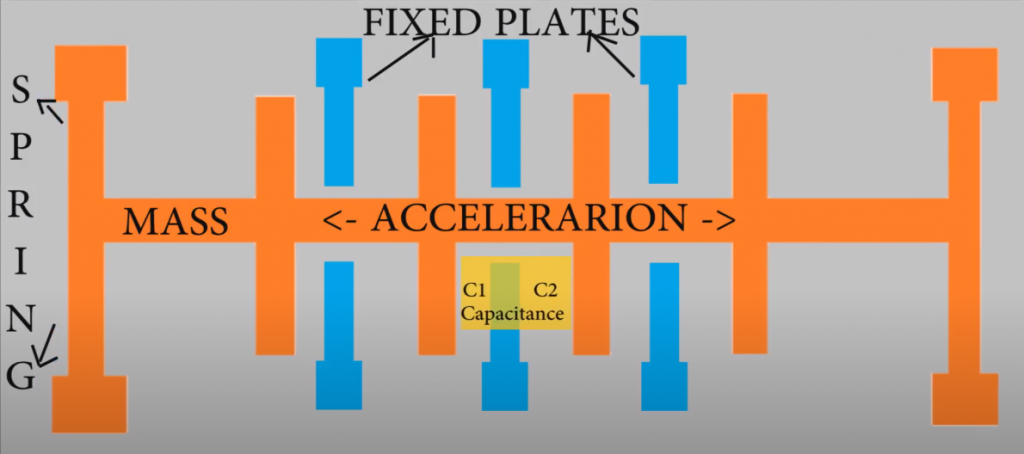
The sensor is consist of fixed plates, springs, and capacitors. The acceleration is measured by measuring the change in the capacitance as the spring moves.
Sample output
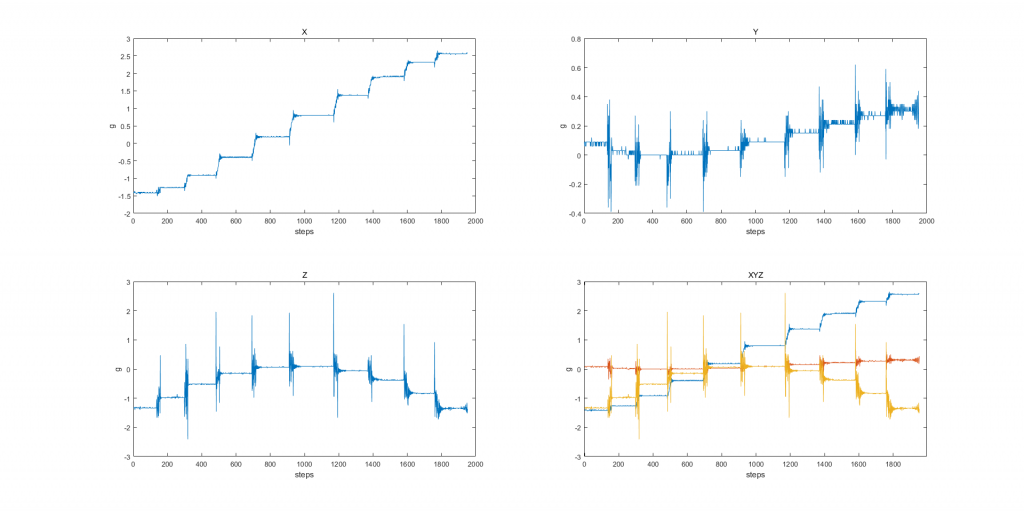
The top plot shows a typical reading of the XYZ acceleration while moving the Alpha bot up and down (pitch) which corresponds to acceleration in x direction. We observe that there are also fluctuation in YZ direction as well.
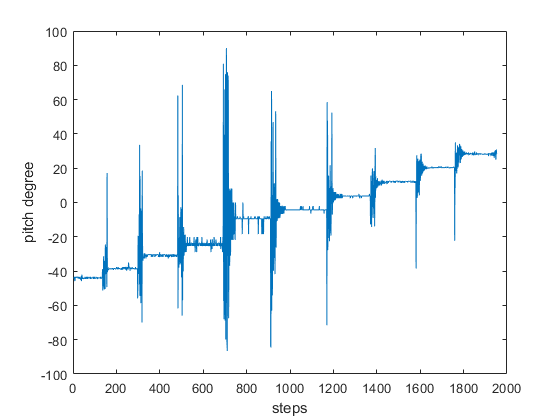
The output can be used for conversion of pitch and roll (yaw is not possible with accelerometer, need gyroscope). The plot of pitch is shown. The fluctuation is due to fluctuation in Z-axis measurement as we see from the previous plot.
Tilt level detection
The acceleratoer can be easily adpated to a level sensor. In the following demo, the safe level is set as parallel to ground, and the green LED will indicate it is safe. As the arm gets lower, the yellow LED will light up. And when it is too low, the red LED is on.
The code is up to the student to develop but it should be very straight forward based on the excercises.