2025 ThirdEye - An Eyelid Measuring App

Introduction

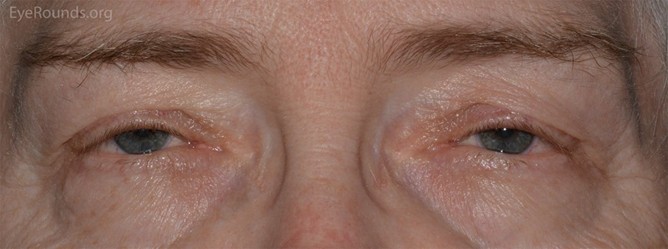
It is well known that as the human body ages some of its functions degrade. On of the main effects of age is the loss of function in the five senses. For sight, this could appear in the form of age-related macular degeneration or the loss of eyelid function resulting in ptosis (colloquially known as “droopy eyelid”). There are several types of ptosis (acquired, congenital, myogenic) but the most common type is acquired ptosis. In a study by Cynthia Matossian, 94 patients aged 50 years or older who scheduled an eye clinic appointment for any reason and had 188 eyes analyzed [1] . Overall, 73.4% of patients had ptosis in at least one eye, and 25.5% had an asymmetric upper eyelid presentation.

Muscles Relevant to Eyelid Function

To assess the severity of ptosis in their patients, osteoplastic surgeons must take certain measurements of the patient’s eye and eyelid. Currently, these measurements are performed manually with a ruler or on static photographs, which introduces variability. Our team is seeking to develop a phone/tablet application that can be used by oculoplastic surgeons for the clinical evaluation of ptosis (colloquially known as “droopy eyelid.”). The application will provide physicians with a standardized, reproducible method and tool to assess eyelid function, which is crucial for diagnosis and determining surgical candidacy.

Patient with Mild Ptosis in Both Eyes

This project aims to develop a mobile device-based software tool that uses facial feature tracking and computer vision to quickly and reliably assess eyelid function in patients undergoing clinical evaluation for ptosis. The proposed computer vision algorithm will automate these measurements by capturing high-resolution pictures and videos of patients’ faces from a fixed distance and analyzing eyelid and pupillary landmarks in real-time. 

By standardizing these measurements, the algorithm has the potential to reduce variability and improve clinical decision-making in both surgical and non-surgical patients. Other groups have attempted to solve this problem, but they ran into issues related to accurately measuring points on the eye that would give accurate measurements necessary to the diagnosis of ptosis.

  • Corneal Diameter is the horizontal distance of the cornea. Usually about 11.7 mm.
  • Corneal Light Reflex is the concentration of light on the center of the cornea produced by a penlight held at the midline
  • Levator function is assessed by measuring the excursion (range of motion) of the upper eyelid margin as the patient moves their eyes from maximum downgaze to maximum upgaze, while the examiner holds the brow stationary to prevent frontalis muscle compensation. Great function is >14 mm, good is 8-13 mm, poor is <8 mm.
  • MRD1 (Marginal Reflex Distance 1) is the vertical distance from the corneal light reflex (produced by a penlight held at the midline) to the central upper eyelid margin when the patient is in primary gaze (looking straight ahead). Typical is 4-5.5 mm.
  • MRD2 (Marginal Reflex Distance 2) is the vertical distance from the corneal reflex to the central lower eyelid margin. Typical is 5-6.5 mm. 
  • Palpebral fissure height is MRD1 + MRD2.

The design methodology for this project can be split into three areas: Computer Vision and Machine Learning (ML), App Development, and Physical Testing Device. A mind map for each of these subsystems, as well as the user experience, was created to organize the priorities to consider in the design of each subsystem.  A description of specifications for each subsystem is found below.

Neural Network & ML

Utilizes Google DeepLabV3 to perform segmentation of desired anatomical features. Dice Score is calculated to evaluate performance of the model predictions.

Goals

  • Output annotated picture on GPU laptop in under a minute
  • Eyelid Measurement Prediction must be within 1-2 mm of actual value
  • Model must be light enough in storage size to be stored locally and on a small server

Application & GUI

Creating an intuitive camera and video application that can access flashlights, store data and photos securely, and can integrate with the machine learning algorithm seamlessly.

Goals

  • GUI should be intuitive enough such that a volunteer can feasibly utilize all of its features in under a minute
  • Total time between taking the picture and receiving the model’s output should be less than 20 seconds
  • Data should be secured safely in a database that adheres to established data protection standards in order to ensure confidentiality 
  • Users should only be able to see data and images linked to their specific accounts

Physical Component 

A phone developed from a Raspberry Pi, a touch screen, and a camera. A 3D printed shell will be designed to house all of the components and ease user comfort.

Goals

  • Users should be able to hold the phone for extended periods of time without feeling discomfort
  • The case should be able to house all components of the phone securely, with no room for loose movement between internal components.
  • The phone should be able to run the application flawlessly, with no discernible performance or functional differences compared to a standard Android device.

Research Problem

How can we use machine learning to recognize facial characteristics and pupil-to-eyelid distances? 

This project’s purpose is to discover the ways in which machine learning can be used to measure pupil-to-eyelid distances. It aims to improve upon current eye-tracking and facial recognition algorithms by enhancing accuracy and real-time performance in scenarios where lighting, head pose, and camera position typically cause a degradation in quality utilizing existing methods. Measuring periorbital distances is important to track disease progression and monitor treatment efficacy. However, current measurement methods involve manually measuring the relevant distances, which is time-consuming and error-prone. An automatic measuring method seeks to remove variability, increase the speed of measurements, and provide data for longitudinal studies of a patient’s condition (Nahass, et al.). 

Educational Problem 

What educational background can we draw from as mechanical engineers to create our app, and what new knowledge can we gain in the process?

Around 85% of this project was dedicated to developing software for both the app and the neural network, leaving only the development of the pi phone in the realm of hardware. As mechanical engineers, this made finding relevant educational backgrounds rather difficult, but ultimately, several were discovered: 

  • The development of neural networks is ultimately predicated on knowledge of statistics. At its core, neural networks, and really all machine learning, utilize statistics to uncover patterns in data and generalize those patterns to new situations. In other words, they analyze the probability distribution of any given dataset and predict future outputs based off that distribution. While not explicitly required by many programs, mechanical engineers will find themselves utilizing statistics in a variety of ways, from simply analyzing data to quality control. Through developing a neural network, students will gain sufficient knowledge in the fundamentals of statistics. 
  • Another fundamental skill necessary for the development of neural networks is control theory. Similar to control systems, machine learning has an algorithm take previously obtained information and uses that information to update itself to create a more optimized system. There are entire fields of mechanical engineering related to control theory, and it is a dedicated part of most curriculums. Utilizing prior knowledge of control theory is key to developing an optimized neural network. 
  • A solid foundation in programming was also required to develop the neural network.  Programming is an essential skill for all mechanical engineers, whether that be for robotics or simply analyzing a complex design. Students will use and gain programming knowledge in Python during the creation of the neural network.
  • The pi phone case is the only hardware system of the overall design, and as such there are many relevant fields of mechanical engineering that can be called upon for its creation. Solid mechanics to analyze the mechanical properties of the case, design analyses to measure the mechanical safety of the case, and material science to determine the best material. Additionally, CAD software such as Onshape will be utilized extensively. Developing the case will require applying and mastering the fields mentioned above, as well as numerous other areas within mechanical engineering.

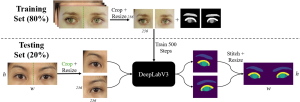
The datasets used for training the ML algorithm was the Chicago Facial Dataset (CFD) and the CelebAMask-HQ (Celeb) dataset, which had 827 and 2015 images, respectively. For the generation of the anatomical masks, five annotators were trained to use the Computer Vision Annotation Tool (CVAT) to draw masks which indicated the iris, sclera, lids, caruncles, and brows. The intragrader and intergrader validation was conducted by having each grader annotate an additional 100 images (60 from Celeb and 40 from CFD), and a minimum of 2-weeks elapsed from the time of initial annotation to allow for intragrader evaluation over time (Nahass, et al.). From theses tests, a Dice Score was calculated to determine the robustness of the data generated. The segmentation models are a DeepLabV3 segmentation network with a ResNet-101 backbone that was pretrained on ImageNet1K from TorchvisionPrior to training and prediction, the input images were split in half and resized to 256 x 256. This similar method was applied to testing, and at the end the segmentation maps are recombined using the same aspect ratio as the initial image. Then the Dice Scores were calculated using the recombined image and original segmentation masks to evaluate model performance.

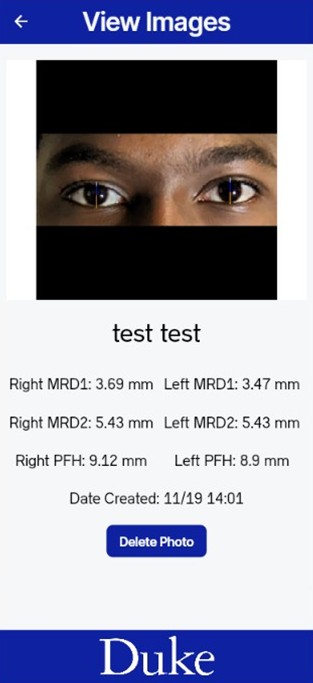
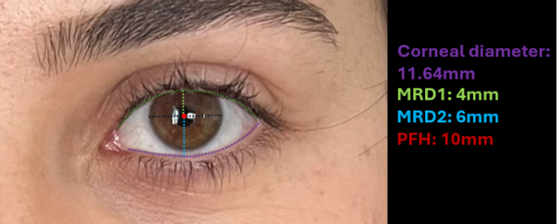
For the prediction of distances, the human annotated segmentation masks provide a benchmark for the results of the ML algorithm predicted results. As for the external reference of distance, we used the iris diameter denoted as 11.71 mm, which was used to convert a pixel count to millimeter distance. MRD1 and MRD2 were calculated from the distance from the center of the iris to the upper and lower eyelids, respectively. Then the palpebral fissure height (PFH), which is defined as MRD1 + MRD2, was calculated by adding these two values together for each eye. For our current proof-of-concept prototype we only show the calculation for MRD1, MRD2, and PFH; however, the ML algorithm can calculate amount of iris shown, inner and outer canthal distance, interpupillary distance, brow heights, canthal tilt, canthal height, vertical dystopia, and horizontal palpebral fissure. 

 Algorithm Pipeline

Original Picture

Algorithm Output

At first, an AI app builder was considered to quickly iterate through different user interface (UI) designs, but a platform called FlutterFlow was found as good platform to build the app before pursuing this first idea. FlutterFlow is based in the Flutter coding language, which is commonly used to build both Android and IOS apps. In addition, it is low code, initiative and has access to easy cloud connection for both linking to an external server where the code would be hosted and storing user data on Google’s Firebase. This allowed more focus to be placed on making the developing the UI quickly and comprehensively.

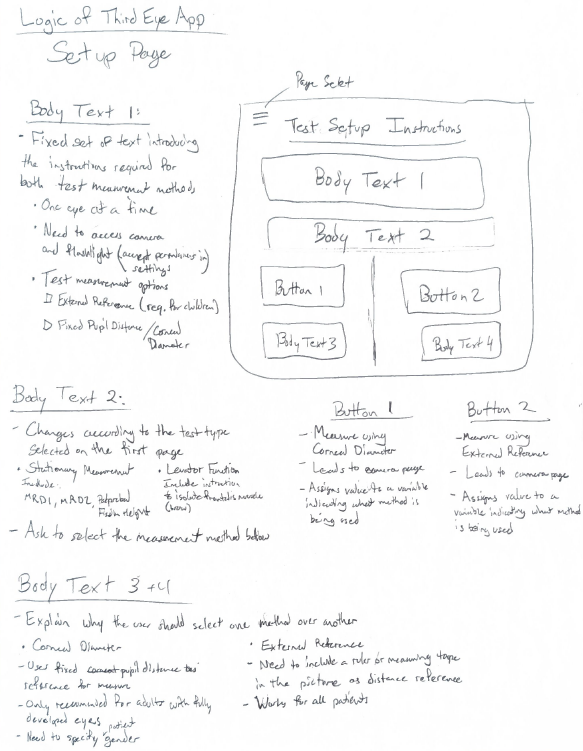
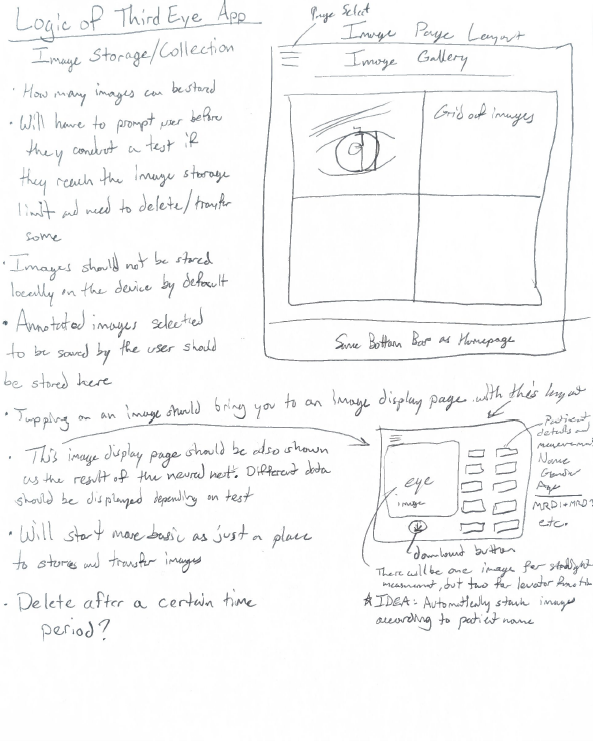
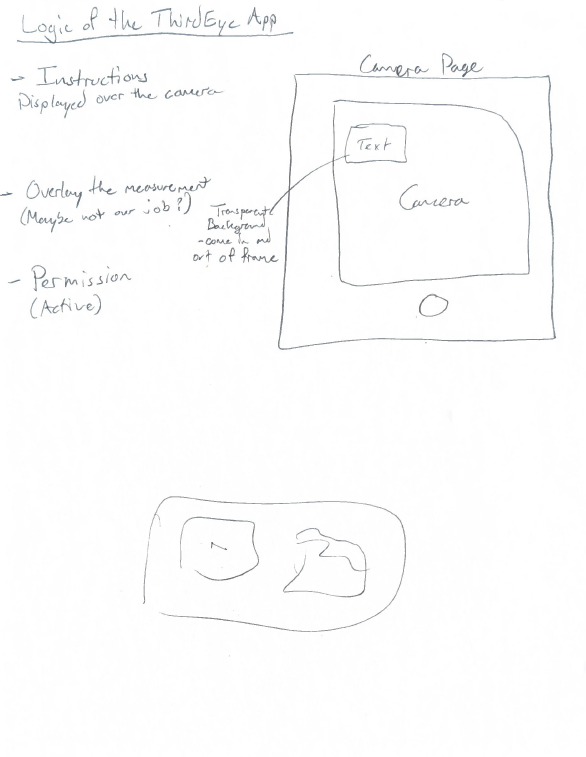
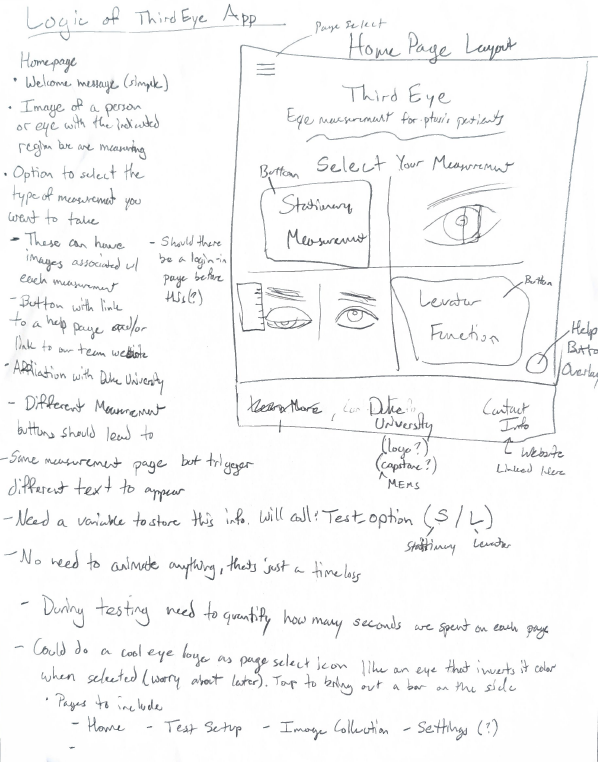
Before starting the code, a prototype of what some of the major pages in the app should look like were hand drawn on paper. This was to define the layout for each page, the logic of the user experience, and define what functionalities each page would require. Once done, app development began by recreating these layouts to learn the platform. Firebase was connected to this app as our means of data storage and filtering for each user. The first pages completed were the Homepage, Test Setup page, Image Gallery, Image display page, and camera page. These formed the core functionality of our app but later it became necessary to add more pages to better improve the user experience and increase the security of the app. These included a login and signup page, subject information page, and another image display page. The prototype for the Homepage is provided in the image below. All prototype pages will be provided in the appendix.

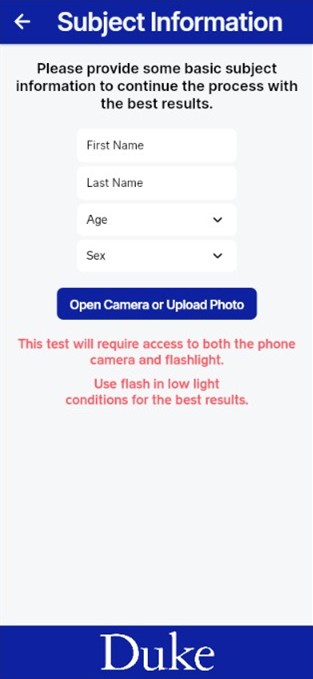
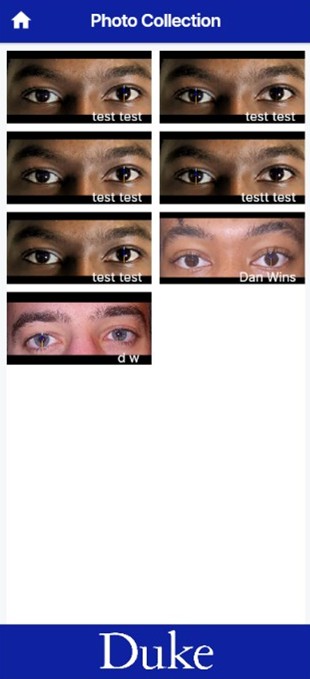
The expected user experience is defined as the following. On opening the app, the user is first directed to sign into their account or make an account, so that they can only access the pictures they have taken. After logging in they are directed to the Homepage, where they are given the choice of selecting which test they would prefer to conduct. Either Stationary eye measurements, where MRD1+2 and PFH are found for both eyes, or Levator Excursion, not yet available in the app due to or focus on building the eye measurement model first. After selecting one, they are taken to a test setup page that explains what each test is and asks for the preferred reference measurement. A choice is given between using a standard corneal diameter or external reference, like a ruler. Currently, only corneal diameter is built into the model. Then, the user is expected to provide some basic information on the subject they are taking for later sorting and easier data retrieval. Only the first and last name of the patient is required, but age and sex can also be provided. Next, the choice is given to upload a previous photo or take a live image as an input for the model. In both scenarios, the image should include the subject’s full face, taken about one foot away from the face with only one person in frame. Both front and back facing cameras are permissible. Once uploaded, the image is sent to an external server when the model is hosted for processing, and the output is returned to the app via an API call. From our testing with different hardware, this takes between 10 and 30 seconds to complete depending on the processing power of the device. Once processed, the image overlayed with annotations is displayed along with the calculated distances, and the option is available to retake the photo if the user is not satisfied with the results or to save the image for storage. Once saved, the user is directed to the photo gallery where they can click to view their saved images with the associated measurements. Screenshots of these app pages are provided in the appendix below. Once the app was sufficiently developed, preliminary testing could be conducted.

Testing was conducted in three ways: web-based testing built into Flutterflow, live testing the app using the Android emulator Android Studio, and testing on a real device. The web-based testing was most useful for early development to test changes without having to download any additional software. However, it is slow to load and did not provide adequate error messages of an error occurred. For these reasons, testing on an emulator was preferred to web-based testing. Using Android Studio, the app could be run on an emulated Android phone live on the computer. This introduced the live update feature where the app could be updated instantly with new changes instead of rebooting each time. It also provided full error messages and access to the computer’s webcam so live photos could start to be input into the model. This revealed that the dataset used was insufficient can could only handle the pre-segmented eye images that it was trained on. This was the preferred testing method, at the cost of only a few hours to setup, until it broke unexpectedly and could not be repaired in time. At this point however, web-based testing was used once again until testing on a real device was available.

Two strategies to connect the NN model to the app were tried in parallel. First, the model was tried to be implemented locally in the app, such that the user’s information would be more secure and possibly load results quicker. However, this presented too many problems to implement within the given timeframe. Instead, having an external server host the model and making an API call to that server to run the model as requested was the preferred method. This may be open to more security risks, but would be sufficient for the purposes of this project, where no sensitive data is yet being collected. Additionally, APIs are the easiest way to allow Pytorch models to be accessed by external applications like Flutterflow, so this method looked very promising. After finalizing the Pytorch model discussed in the neural network section, a simple Python script designed to expose it through an API was created. In order to create this API, the Python web framework FastAPI was used. It is a package in Python that is capable of building APIs using standard python hints. In simple terms, it takes the basic functionality of a model and creates endpoints that can take requests (external inputs) and run them through the model’s logic to create an output. The server used was Uvicorn, a web server designed to run APIs that use a Python framework like FastAPI. The validity of this method was tested by running the model, API, and sever on a computer using Window’s PowerShell. The process took around 15 seconds and outputted the correct annotated picture. After testing and approving the validity of the method, all relevant files (model, server, Python script creating API) were added to a GitHub repository, which will be linked in the appendix. The repository was then connected to Render, a cloud platform that deploys web applications. After deployment, Render creates a public URL that allows anyone to access the API endpoint and input a picture to get an annotated picture back as an output. Flutterflow uses the public URL to do the same exact thing: make an API call to send an input picture to the endpoint, and then receive the output back on the app. After integrating the URL into the app, Flutterflow and the model are essentially linked, connecting the two subsystems together. 

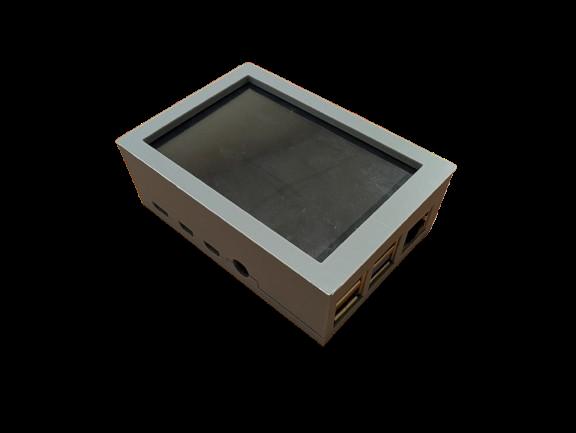
To test on a real device, the app was connected to the Google Play Store and setup as under the internal testing track. This allowed for only those designated as testers to access the app. Internal testing was conducted on three devices: A Samsung A10 provided by the Co-lab, our personal phones, and the Raspberry pi power phone we made (that will be further discussed in the next section. Each device provided a different pixel count and a different amount of processing power such that we knew how the app would look and how smoothly the app would run over a range of different options. Once the model was finalized and integrated into the app, even on the lowest processing power device, took less than 20 seconds to load. This means a user could reasonably open the app and get the information they need in under a minute.
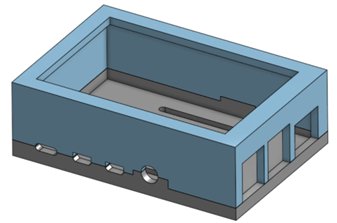
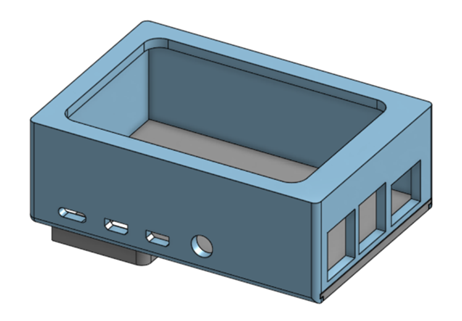
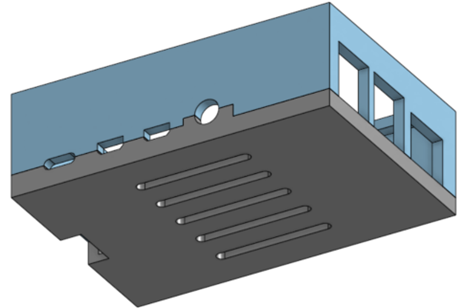
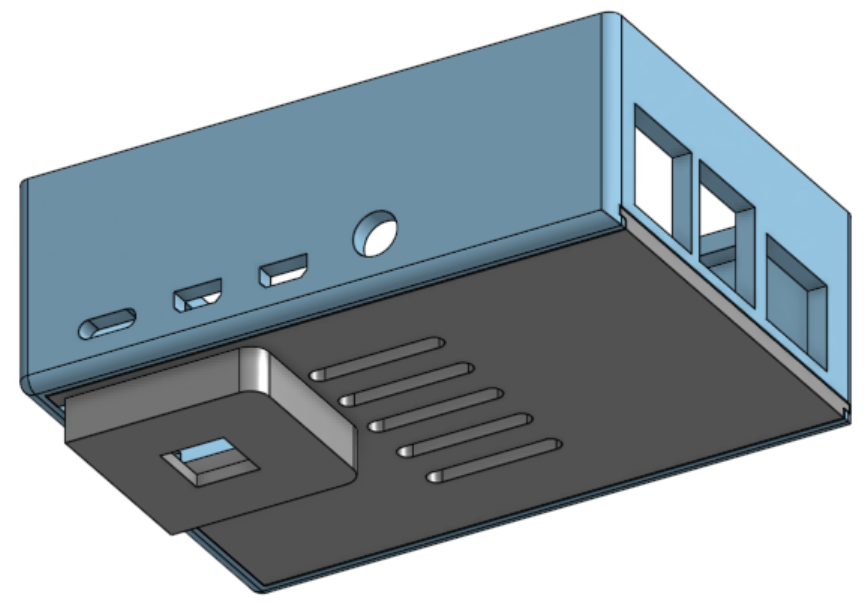
Despite the computational focus of this project, it was necessary to include a physical component to ensure there was a mechanical backbone to the system. An initial idea was to create a phone attachment that could be lightly pressed against a subject’s face to isolate the ocular area from exterior sources of light. This would fix the distance each picture is taken from and help filter out the noise caused by exterior light pollution, possibly improving processing speed and accuracy. However, the specific conditions imposed by this scenario might make the model more sensitive to more standard lighting conditions, varying camera qualities, etc. While more features could be fit into a more general approach, taking a photo at various distances and of both eyes at the same time. For these reasons, a second idea was pursued. That being, creating a customizable “phone” powered by a raspberry pi such that different hardware components, cameras and screens, could be easily interchanged, allowing for the testing of different processing speeds, camera qualities, and UI interactions.


The “Pi phone” was powered by a raspberry pi 4b, featuring a 5 inch screen, 1080p camera, and runs the app on a version of Android 15. Two designs were made for a custom case to enclose these components. The first design enclosed the device by clamping together the top and bottom pieces of the case, held together by a press fit. This design was improved to a slider joint design where the bottom plate would slide into a slot on the top plate to better secure the interior device. Unfortunately the current case design could not be finalized before the end of the semester. The Pi phone did not comfortably fit inside of it and there was too much space for components to move around. In the future, the case will be focused on to a greater degree to ensure that the phone fits properly.


To get the Pi phone running, the display first needed to be configured, and an Android operating system was installed. Initial installation steps followed the manufacturer’s instructions for the 3.5-inch display [10]; however, the display failed to function after multiple configuration attempts. As a result, a larger 5-inch display was purchased, which was successfully configured using guidance from an online reference [11]. An Android 15 OS build licensed for educational and personal use was then installed [12]. Finally, the screen settings were adjusted by modifying the DPI and rotating the display by 90 degrees to achieve a vertical orientation that more closely resembles a standard smartphone.

Clamp Design Top Isometric View
Slider Design Top Isometric View
Clamp Design Bottom Isometric View
Slider Design Bottom Isometric View
Picture of Pi Phone Prototype

As of the end of the semester, most goals for each subsystem were achieved, and a functioning app was developed. The algorithm gives MRD1, MRD2, and Palpebral Fissure measurements within 1-2 mm of the ruler estimated measurements; verified by a certified ophthalmologist [7]. Many trial pictures were taken with different lighting environments and camera positions with no discernible effect on the final measurement. Some of these lighting conditions included a dim room, an open field with the face partially obscured by a glare from the sun, and a room with normal lighting as the control. Camera positions included a selfie taken from ~4 inches away, a selfie taken from ~ 2 feet away, and a picture taken with the rear camera from ~5 feet away. 

The application is capable of capturing an image and returning the relevant measurements within 10–15 seconds when a stable network connection is available. This represents an approximate 25× speed improvement compared to ImageJ and a 5× improvement over manual measurement methods. At present, FlutterFlow requires access to the URL hosting the server and model, making a reliable network connection necessary. In the future, the model may be deployed locally on individual devices after download; however, a server-based approach was chosen for simplicity at this stage.

While the app is designed to be as intuitive as possible, testing the ease of use has not yet been conducted. In the future, this will be done by having random people across the campus attempt to utilize the app and all its features. They will be asked how comfortable the UI is to navigate and how appealing tit is to navigate, and any suggestions will be considered and implemented accordingly. 

The Pi phone was fully coded, and the infrastructure was fully built, with the app able to run perfectly on it. However, the case for the final version of the phone could not be finalized due to time constraints. It was too loose of a fit for the phone, and the components were able to slide between walls freely, potentially damaging them. In the future, efforts will be made to finalize the design of the case so that it can be comfortably used with the phone. 

This project will continue to be developed beyond the scope of this class as a long-term business endeavor. ThirdEye LLC plans to pitch the application to additional ophthalmologists in order to gather further clinical feedback and refine functionality. This feedback will guide future iterations of the app and help position the product for broader adoption within ophthalmology practices. Known functions that will be added in the future include a levator excursion measurement to determine the levator muscle function in patients and a pupil diameter measurement for use in neuro-ophthalmologyMost future improvements will focus on optimizing the algorithm to maximize accuracy and broaden its diagnostic capabilities, but the application’s user interface and overall design will continue to be refined as well.  

App Page Screenshots

Home Page
Test Setup Page
Subject Info Page
Image Review Page
Image Collection Page
Stored Image Viewer Page

App Prototype Page Layouts

Home Page Layout Plan
Test Setup Layout Plan
Image Storage Layout Plan
Camera Page Layout Plan


Screen Installation

https://www.lcdwiki.com/3.5inch_RPi_Display  

  • Initial steps to install the touch screen on the website. 
  • This didn’t work for one screen; in that case follow these steps. They might be better to follow in the long run anyways: Reddit Link


Android 15 OS Installation on Raspberry Pi

https://konstakang.com/devices/rpi4/LineageOS22/  

  • Steps to install on website + YouTube tutorials 
  • Is a build that has licensed use 
  • Can be used for educational/personal use NOT commercial 
  • Install the google playstore using steps in website 
  • Rotate the screen by 90 degrees to have vertical display that matches phone better 
  • Configure the display for your screen size by changing the dpi settings in advanced settings 

Team

Akai Senthill
Sam Wood
Daniel Winfield
Dionni Campbell

App Design & ML/App Integration

Computer Vision & Algorithm Development

Computer Vision & Pi Phone Development

App Design & Case Construction/Design

References

  1. Gupta, A. K., Seal, A., Prasad, M., & Khanna, P. (2020). Salient Object Detection Techniques in Computer Vision—A Survey. Entropy, 22(10), 1174. https://doi.org/10.3390/e22101174
  2. Patel, K., Carballo, S., & Thompson, L. (2017, March 1). Ptosis. ClinicalKey. https://www.clinicalkey.com/#!/content/playContent/1-s2.0-S0011502916300852?returnurl=https:%2F%2Flinkinghub.elsevier.com%2Fretrieve%2Fpii%2FS0011502916300852%3Fshowall%3Dtrue&referrer=https:%2F%2Fcrossmark.crossref.org%2F
  3. Quan Wen, Feng Xu, Ming Lu, and Jun-Hai Yong. 2017. Real-time 3D eyelids tracking from semantic edges. ACM Trans. Graph. 36, 6, Article 193 (December 2017), 11 pages. https://doi.org/10.1145/3130800.3130837
  4. Seamone, A., Shapiro, J. N., Zhao, Z., Aakalu, V. K., Waas, A. M., and Nelson, C. (November 27, 2024). “Eyelid Motion Tracking During Blinking Using High-Speed Imaging and Digital Image Correlation.” ASME. J Biomech Eng. January 2025; 147(1): 014503. https://doi.org/10.1115/1.4067082
  5. Stephan Joachim Garbin, Oleg Komogortsev, Robert Cavin, Gregory Hughes, Yiru Shen, Immo Schuetz, and Sachin S Talathi. 2020. Dataset for Eye Tracking on a Virtual Reality Platform. In ACM Symposium on Eye Tracking Research and Applications (ETRA ’20 Full Papers). Association for Computing Machinery, New York, NY, USA, Article 13, 1–10. https://doi.org/10.1145/3379155.3391317
  6. S. V. Mahadevkar et al., “A Review on Machine Learning Styles in Computer Vision—Techniques and Future Directions,” in IEEE Access, vol. 10, pp. 107293-107329, 2022, doi: 10.1109/ACCESS.2022.3209825
  7. Dr. James Robbins (Duke Ophthalmology Department) – https://medicine.duke.edu/profile/james-robbins
  8. EyeRounds. EyeRounds.org. Retrieved December 16, 2025, from https://eyerounds.org/#gsc.tab=0
  9. Matossian C. The Prevalence and Severity of Acquired Blepharoptosis in US Eye Care Clinic Patients and Their Receptivity to Treatment. Clin Ophthalmol. 2024 Jan 10;18:79-83. doi: 10.2147/OPTH.S441505. PMID: 38223816; PMCID: PMC10788066.
  10. LCDWiki, 3.5inch RPi Display, LCDWiki.https://www.lcdwiki.com/3.5inch_RPi_Display
  11. Reddit, I finally have the 3.5inch GPIO SPI LCD working, https://www.reddit.com/r/raspberry_pi/comments/1bnav0y/i_finally_have_the_35inch_gpio_spi_lcd_working/
  12. KonstaKANG, LineageOS 22 for Raspberry Pi 4, https://konstakang.com/devices/rpi4/LineageOS22/
Tweet