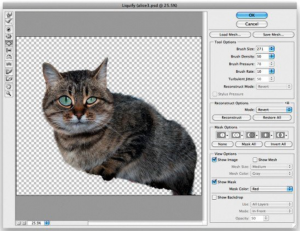
 One useful feature for editing images in Photoshop is the Liquify Filter, which can be used to move and distort pixels while maintaining original image quality. The liquify feature has many different tools, such as push, pull, rotate, reflect, pucker and bloat.
This post will cover five popular features of the Liquify Filter – Forward Warp, Twirl, Pucker and Bloat, Push, and Mirror.
In order to use the liquify filter on an image:
- Upload the desired image in Photoshop
- Access the liquify filter by clicking Filter->Liquify
- Familiarize yourself with the different aspects of the filter. On the left side of the screen, there will be a toolbar with all the tools, and on the right side of the screen, there will be an options panel, with different settings for each tool. You can specify the settings for the active tool using this panel.
Tool 1: Forward Warp
- The forward warp tool allows you to pull pixels of an image forward as you drag your mouse. The amount of pixels that are dragged can be controlled using the brush size option in the right panel.

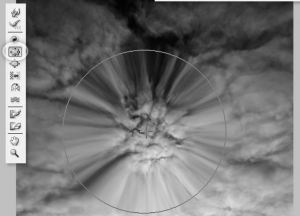
Tool 2: Twirl
- The twirl tool allows you to rotate pixels clockwise as you click or drag. If you want to move counterclockwise, press the Option (Alt) key while you are clicking. To control how quickly the twirling occurs, change the brush rate setting in the right panel.

Tool 3: Pucker and Bloat
- The pucker tool allows you to pull pixels towards the center of the brush area when you click. This tool is useful for creating an inflated effect.
- The bloat tool allows you to pull pixels away from the center of the brush area when you click. This tool is useful for creating a deflated effect.

Tool 4: Push
- The push tool allows you to move pixels left or right, when you drag the mouse up or down respectively.

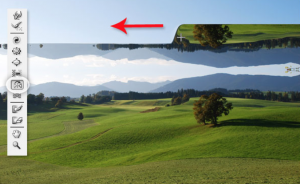
Tool 5: Mirror
- The mirror tool allows you to add a mirror effect to an image by duplicating pixels perpendicular to the direction of the stroke. To create a vertical mirror reflection, drag the mouse from left to right (or right to left). To create a horizontal mirror reflection, drag the mouse from top to bottom (or bottom to top).
—
Learn more about Duke’s Enterprise Term License Agreement with Adobe: http://sites.duke.edu/software/2015/11/06/adobe-creative-cloud-and-acrobat-pro-dc-licensing-now-available/
Adobe software can also be accessed in the Multimedia Project Studio (006 Bostock Library).