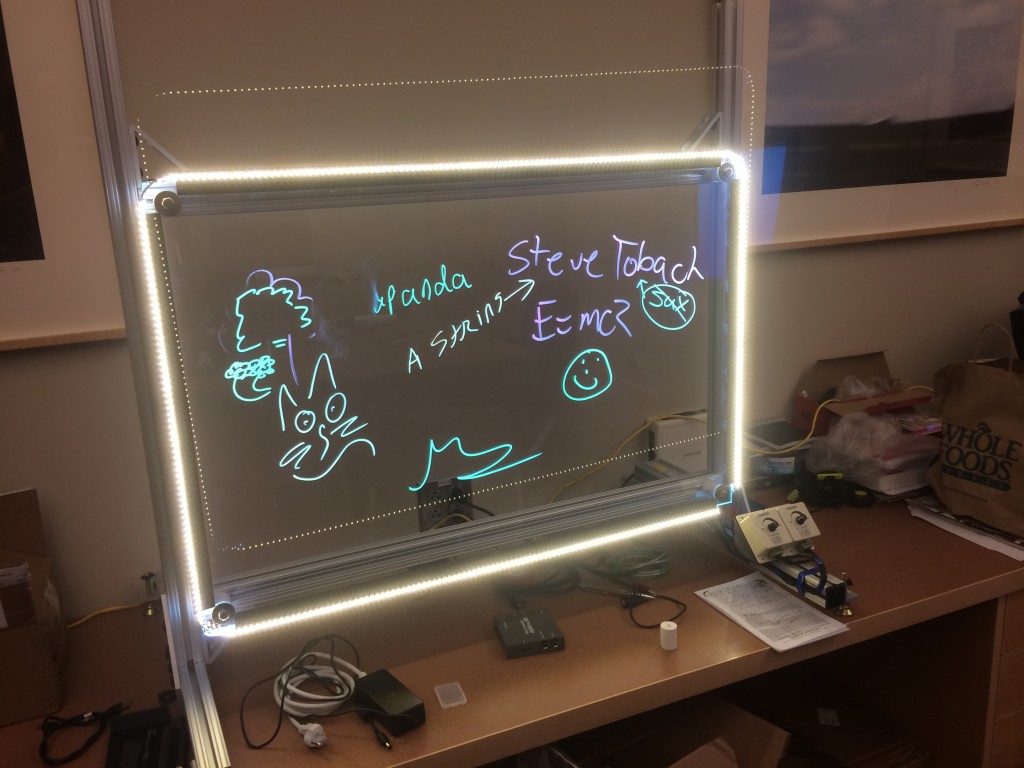
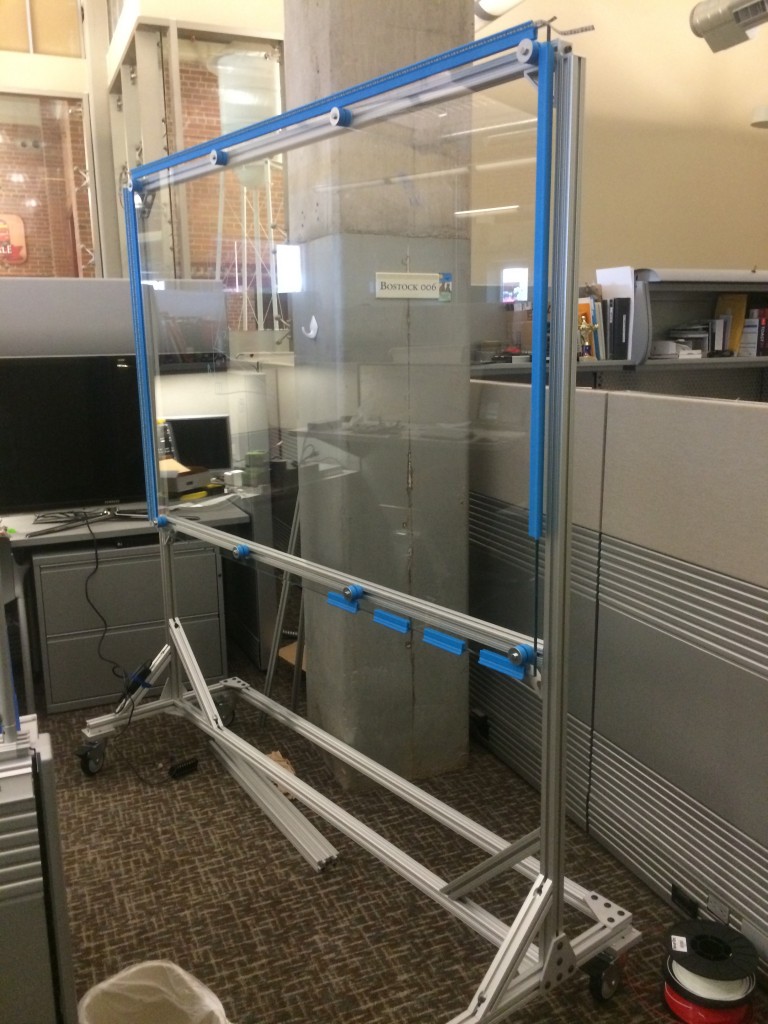
Based on some AMAZING work being done at Northwestern University, Chip Bobbert from Duke’s ITS group partnered with the Duke Digital Initiative to build our own. We decided to first build a desktop prototype to work out construction challenges. That has proven to be a great approach as there were many.
Rather than welding parts, Chip used his experience with pre-fabricated aluminum parts from 80/20 to construct the frame for the piece. Billed as the “Industrial Erector Set” – the parts from this company really helped make this project achievable. Once the glass arrived, Chip realized that glass offsets that were commercially available would not do the trick. Since Chip also heads up DDI/ITS’ 3D printing project, he used that technology to create the offsets.
When it came time to mount the LED’s, Chip added a new feature of “self lighting”. A second set of LED’s were added to the original design which lit the glass edges to allow the neon Expo markers to illuminate. This second set was a warmer color temperature and was used to light the subject, eliminating the need for external lighting. Dimmers were added to control both the edge light illumination and subject illumination.
In the example below, we tested using a $0.99 app called “LightDV” to flip the video in real time. For the desktop version, it’s thought that the subject could use their iPhone or iPad on a tripod stand to shoot the video, flipping in real time. Other tools such as Screenflow can also flip the video in post production.
The large version is still under construction. Challenges with the larger design and ordering parts will make this deliverable later this summer. Duke Media Services will take delivery of this and experiment ways in which they can provide this as a service to interested faculty and students.
Once the project is completed, Chip will provide a complete set of parts and details on construction if other schools or departments want to create a light board on their own.


Duke Media Services is looking forward to seeing what this might help us produce with engaged faculty clients.
Who’s responsible for the disco soundtrack on the demo video? Very Studio 54!
YouTube Audio Library!
Really cool!
Thanks for posting this project! We are working on creating our first prototype lightboard here the University of Arkansas, and this blog is extremely helpful. We are most curious about your upcoming posts on the fabrication of your full-size board frame using the 80/20 aluminum channel.
Quick Questions:
It looks like you chose glass over plexi. We are leaning this way too. Are you using tempered glass, and if so, are you having any issue with “wavy, fun house effect?” Our glass guy said this could happen.
With the larger board on wheels, are you having issues with it moving, even when the wheels are locked?
Are you planning on posting your purchase list from 80/20?
Thanks so greatly for posting this for everyone! We appreciate your help and insight.
Jessica,
Thanks for checking out our blog! I am actually finishing up the full sized prototype today and will spend the rest of the week working on documentation, look for a post in the near future.
To answer your quick questions; we chose glass over plexi for a few reasons. In this project I learned more about glass than I ever wanted too. The tempered glass is more scratch resistant which is the primary reason we picked it. Secondarily, our “glass guy” informed us it was higher transmission, meaning more efficient for the camera. We also bought low-iron glass which takes some of the natural blue tint out. You probably never noticed that with your eyes but cameras pick it up. We were worried about the wavy effect you mentioned, our glass guy said it could happen. We simply put a lot of faith into him and paid extra for the highest quality piece we could get without going to NASA.
About the casters, we bought very high quality casters. I’m an avid builder of things and learned the cheap-caster lesson the hard way. Better casters have teeth that lock into place. Our is very stable, most of the wobble comes from the carpet it’s on. That said there is still a little bit of play, our production people are going to throw sandbags on it until it caves in or stops moving 🙂
Hello Chip,
This is all super helpful! Your timing is incredibly serendipitous, and we very much appreciate all of the extra effort you are putting into documentation!
I know what you mean about “more than you ever wanted to know…” I am now well versed in LED strips, refraction, AR coatings and transmission rates 😉 Whew!
I saw that the original lightboard creator (Dr. Peshkin) had paid a mint for “Starphire” optically clear glass, but I was hoping maybe we could say $1k and color correct it post production. We have a media team and studio with lights where this board will be used. I think you all (and our “glass-guy”) have talked us in to going glass over plexi. The biggest factors where 1. by the time you get to .25″ plexi, it weighs the same as glass; and, 2. Glass-guy says plexi will stain over time.
Thanks for the beta on the casters. I was thinking that sand bags would be the way to go, and we already use them on the C-stands in the studio. We do at least have a solid floor to work on.
Our plan now is to do a mini version at 3×5′ to act as a prototype that will also be more portable than the biggie 4×8′
One last question on LEDs: There seems to be an inverse relation between lumens and # of LED/ ft once you get into the 5050 and then the S35. Did you choose your LED strip for lumens, or evenness? In other words, would you vote 600 LEDs/ 5m@140lm, or 180 LEDs@3m @440lm? Also, did you test the 6000k vs the 3000k with the markers?
Looking forward to your next post! Thanks again for your help.
Jes
Jessica – the clear glass is not just about avoiding a color bias on video. It’s also about getting the LED light from the perimeter of the glass all the way to the middle, so that it can make the markers glow brightly.
If you look at ordinary glass from the edge it is very dark green. The starphire glass is only faintly blue; light can get through many feet of it.
Hello,
This is excellent! Great work!
We are undertaking our own version of this as well. We have access to a 3d printer which is nice. However, I was looking at your documentation page, and I noticed there were a couple of links that were missing in the 3d section. LED Clip, LED Dimmer Bracket, Fuse Block and Cover, and Terminal Standoff. I was wondering if you happen to have those links?
Thanks everyone, and great work!
Hi Brandon,
Not sure why some of the links weren’t showing up in the Wiki. In any case, we’ve updated it and I added a few other items as well. The Wiki will continue to evolve as we refine the design but this should be most of it. https://wiki.duke.edu/display/LIG/Lightboard
Outside of the wiki, most of the designs can be found here on Thingiverse: http://www.thingiverse.com/bobbertd/designs/
Good luck and please share pictures when you finish yours!
Reply
Hi Brandon,
Not sure why some of the links weren’t showing up in the Wiki. In any case, we’ve updated it and I added a few other items as well. The Wiki will continue to evolve as we refine the design but this should be most of it. https://wiki.duke.edu/display/LIG/Lightboard
Outside of the wiki, most of the designs can be found here on Thingiverse: http://www.thingiverse.com/bobbertd/designs/
Good luck and please share pictures when you finish yours!
Thanks for posting this info here and on the wiki, you are awesome! We’re thinking about building one at UC Berkeley, and I’ve got a couple of questions:
First, regarding the 3d printed parts. What kind 3d printer did you use? I have access to an Afina H series, but the max build size is 5.5″ cubed, and it’s typically used for prototyping parts. The up side is that it’s cheaper for me to use. Do you think it would work?
Second, after having the board and using it for a while, how has it held up in practice? Are there any things you would recommend doing differently?
Thanks,
Drew
We are making a lightboard for educational video-making.
One thing I noticed with the glass on the wiki is that the schematic is listed in decimal values of feet. Our glass guy had no idea how to approach this and decided that 3/15ths of an inch was the same as 3/16ths of an inch, as they had no way of manufacturing in 15ths. The difference is only an 80th of an inch but thats on top of tolerances as it is.
In the bill of goods section for the 6X4 board 24 LED clips are listed, but in the custom fabrication section of the same board 48 clips are listed. I am assuming 48 is the right amount as 24 is for the smaller board I believe.