Designers: Lorraine Campos, Kaustav Shah, Nishkala Shivakumar
Advisor: Amanda Hall, OT
Supervising Professor: Kevin Caves
Abstract:
Learning how to play the recorder in music class is an expected part in elementary school curricula. However, our client, Nicole, has a rare genetic condition known as Spondyloepiphyseal dysplasia congenita (SEDC). Common manifestations of the condition are seen in her short stature, short and thick fingers and reduced grip strength. Consequently, she cannot play the regular recorder. However, her music teacher, Ms. H, has expressed her desire to have her fully participate in the class. Keeping this in mind, we have developed an alternative method using a commercially available piccolo recorder that allows our client to play the recorder.
Introduction:
Our client is Nicole and she is a student at a local elementary school. She has Spondyloepiphyseal dysplasia congenita (SEDC), a rare genetic condition that results in skeletal and joint deformations starting prior to birth [1]. She has a growth deficiency, which is one of the most common symptoms of SEDC. As a result, her arms are disproportionately short compared to the rest of her body [2]. Additionally, the fingers on her hand are larger than normal which limits her functionality in gripping and expanding her hand. Nicole has found clever work-arounds to many daily tasks that require finger and hand dexterity. She demonstrated her ability to write using a pencil and pick up a cup through her own methods that prove comfortable.
Her music teacher, Ms. H, expressed a desire for Nicole to be able to participate fully in the recorder portion of the class. As a result of her shorter arms and larger fingers, she had difficulty using her right hand to play the lower notes on the recorder. A commercially available piccolo recorder is smaller and allows her to play the notes of the recorder with greater facility using her right hand. [3]. However, with this recorder, the holes are smaller and spaced closer together and with Nicole’s increased finger size, she covers multiple holes which makes the fingering on the recorder difficult. There are no commercially available products that she can use to ensure that only the desired holes of the recorder are covered. Lastly, her finger and grip strength are also diminished which make it difficult for her to support the weight of the recorder. Our group was inspired by a design team at the University of Maine that attempted a project to design a recorder for a one handed student last year [4].
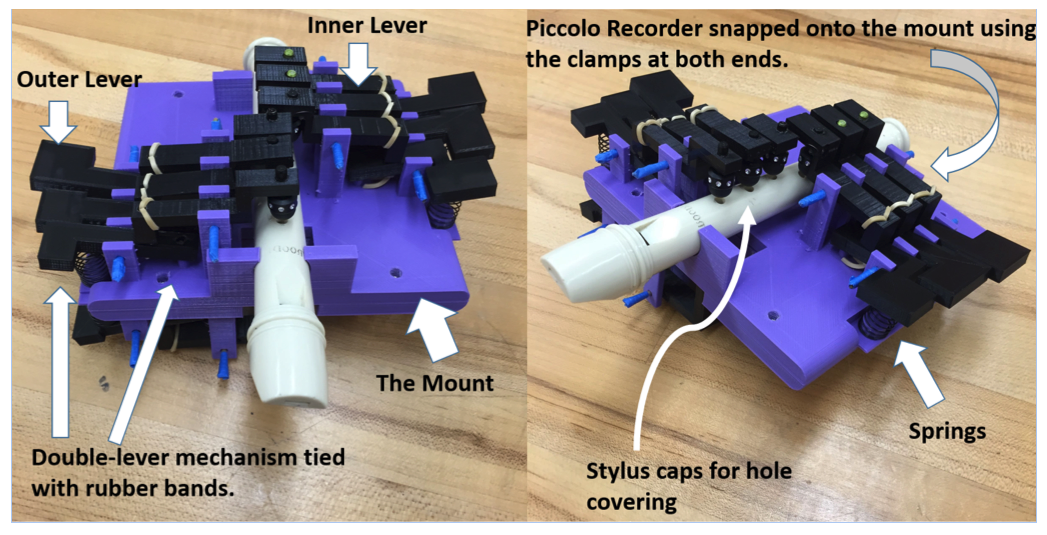
Figure 1. Overall design of the mount and lever system including the attached piccolo recorder.
Project Goals:
The goal of the Rock and Recorder team is to create a mechanism that will allow Nicole to be able to play the recorder. The device should mimic the fingering style of a normal recorder so she can follow along with the rest of the class. It should have the same note range of a normal recorder while having the functionality that allows her to play it without straining her arms or fingers. The device should be simple to use so that it does not require additional effort from Nicole or the music teacher before and after the class. It should also be safe for the school environment.
Design and Development
For this project, we created a 3D printed recorder mount. The mount has buttons that were custom designed for the client’s finger size and shape as well as double lever system that closes the appropriate hole of the recorder when the button is pressed. This device accommodates for the client’s short and wide fingers by placing the buttons at a comfortable position. In order to play the recorder using our device, the client should hold the sides of the mount using her palms, put her mouth to the mouthpiece of the recorder and press down on the outermost levers that correspond to the fingering mechanism (following the peripole fingering chart) she wishes to play on the recorder. Pressing down on the outer levers will then cause the inner levers to be depressed and allow the stylus caps to cover the recorder holes. This creates an airtight seal and mimics what finger pads would be able to do.

Figure 2. Detailed figure showing the double lever mechanism, springs and rubber band attachments and the stylus cap for hole coverings
Due to her physical limitations, our client cannot play the regular recorder, so we chose to use the Piccolo recorder in our design to address both weight restrictions and client preference. The Piccolo recorder is sized such that she can comfortably hold the instrument for desirable periods and it produces the same notes as a regular recorder. The device developed has three main components, a support system for the recorder, a method through which the client can press down two combined levers to close over the holes and finally the hole covering mechanism.
We built a device that has a mount as the support system, slats as the attachment points for the double levers and stylus caps attached to the inner levers such that an airtight seal can be created for the holes. In order to play the device the client should press down on the outer levers corresponding to the fingering pattern she wishes to reproduce, according to the peripole-fingering chart made available to us by her music teacher. Instructions with more detail on how to use our device are below. Refer to Figure 1 shown below for a large-scale picture of the device design.
Figure 1. Overall design of the mount and lever system including the attached piccolo recorder.
The mount as the support system
The mount is large enough so that the recorder can fit and it has one clamp at each end to which the recorder can be snapped into. The mount was printed with small slats that are the attachment point for the double lever system, the slats were placed to correspond to the holes the client will need to cover for her music class. Once the double lever system has been attached to the slats the client can press down on the outer lever to close the recorder holes. The mount has rounded edges such that the material will not pose any risk to the client and it is thick on the sides so that the client can support it only with her palms and right thumb, leaving her fingers free to push down on the levers. Finally, the mount was also designed to include attachment points for the springs that go under each outer lever to ensure that it returns to resting position once released.
The levers
Each double lever system corresponds to one hole that needs to be covered for the client’s music class. There are holes on the slats and on the levers to allow a total of five brass rods to act as fulcrums for the levers, accounting for the front and back of the recorder. Once attached, the levers were designed to overlap each other so that when the client presses the outer lever it causes the inner lever to go down and cover a single recorder hole. Springs were attached to the bottom of the outer lever to ensure that after it is released it will return to its resting position and allow the recorder hole to remain open. Finally, the inner lever was attached to the outer lever with a rubber band to ensure that it would return to resting position when the outer lever was released. The closing mechanism is discussed in the following section and both the levers and closing mechanism can be seen in figure 2 below.
Closing mechanism
Finally, the closing mechanism chosen were stylus caps attached to the innermost lever, so that when it is depressed the corresponding recorder hole is covered by something soft and deformable. The stylus caps are 8 mm in diameter and are can be inserted into drilled holes in the inner levers. These holes were drilled after careful measurements to ensure that when the stylus caps are inserted and the lever is depressed it closes over the entire hole it corresponds to. Deformability of the closing mechanism is key to creating an airtight seal and ensuring that the hole is adequately closed for the desired sound to be produced.
Figure 2. Detailed figure showing the double lever mechanism, springs and rubber band attachments and the stylus cap for hole coverings.
Design Process
Considering the design process, the mount and levers were designed using Inventor, taking into account the precise measurements of the recorder, hole spacing and distance from the edge of the mount. These designs were altered according to client preferences and other suggestions. The current design seen above was 3D printed.
Evaluation
The recorder system was designed to make it comfortable for the client to play. The first major design criteria was to have the device be manageable for the client to hold and therefore the entire system was designed to weigh less than 1.0 lb. The system was weighed at 0.25 lb in total. The keys were designed with a spacing of roughly 1.3 cm so that she could press down on each one individually without accidentally pressing multiple. The entire device was designed to minimize the reach so that she would not have to extend her arms more than 20 cm. When the client was playing the device, the maximum reach measured was 16 cm. The buttons that the client needed to press required a force of less than 1 lb and required to be displaced less than 0.5 cm. The force required to press the key was measured to be 0.25 lbs. Additionally, our client was observed playing the device and did not exhibit any discomfort in holding the device, reaching the keys or pressing them down. Surveys using a 5-point Likert scale were conducted with the client, her mother, music teacher and occupational therapist to assess all of these factors relating to how the modifications designed helped our client play the recorder. Results are summarized in Table 1 below.
The pitch of the notes was evaluated by comparing the sound from our device to an online piano software. This was the area where there was some concern but in our testing, most of the notes were roughly within one step of their desired pitch. When meeting with the music teacher, she expressed concern for the pitch and rated it low (see Table 1).
It was also important for the device to be safe since it will be used in a classroom setting. While designing, care was taken to minimize any corners or rough edges. A survey was conducted to assess the safety and the results are in Table 2 below. Finally, the overall satisfaction with the device was rated and the results are in Table 3, below.
Device Quality Survey Results
| Category | Average Score |
| Nicole will be able to hold this device comfortably for 40 seconds. | 4.5* |
| Nicole will be able to easily press down on the levers. | 4* |
| The notes (low D, E, G, A, B, high D,F#), when played, sound adequately in tune. | 1** |
| It is easy for Nicole to switch between different notes. | 4* |
| It is not painful for Nicole to use this device for an extended period of time. | 4* |
Table 1: Device Quality Survey Results
*indicates feedback from client and client mother, ** indicates feedback from music teacher
Device Safety Survey
| Category | Average Score (n=3) |
| I feel this device is safe for classroom use. | 4.66 |
Table 2: Device Safety Survey Results
Overall Satisfaction
| Category | Average Score (n=3) |
| Overall, I am satisfied with the device. | 3.66 |
Table 3: Overall Device Satisfaction Results
Discussion and Conclusion
Our device was able to adequately meet the project goals previously described and attended to criteria detailed in the need specifications written for the project. Each part was carefully designed so that the recorder fit well on the mount and that the double-lever system was well aligned with the holes in the recorder. The device components added to the piccolo recorder came together nicely to ensure that the modifications allowed our client to overcome some of her physical limitations and play the instrument in a similar manner as her classmates. She will be utilizing this device in her music class next semester. The modifications for the device did not necessitate changing the fingering chart that the music teacher intends to use in the upcoming class, which is a positive overall aspect. The final design and all associated costs still left us well under the available budget. Note that there are no commercially available products in the market with this specific functionality and custom-made, modified instruments are hundreds of dollars more expensive.
References
- Welcome to Little People of America. (2013). Retrieved October 28, 2015.
- Spondyloepiphyseal dysplasia congenita. (2015, September 14). Retrieved September 15, 2015, from http://ghr.nlm.nih.gov/condition/spondyloepiphyseal-dysplasia-congenita
- Spondyloepiphyseal Dysplasia, Congenital – NORD (National Organization for Rare Disorders). (n.d.). Retrieved September 14, 2015, from https://rarediseases.org/rare-diseases/spondyloepiphyseal-dysplasia-congenital/
- http://www.amazon.com/Aulos-Classroom-Recorder-Garklein-Piccolo/dp/B0023GNP9W
- Hall, A. (2015, August 26). Information on Client [Telephone interview].
- http://umaine.edu/met/capstone-projects/2015-recorder/team-3/
Acknowledgements
National Science Foundation Grant CBET 3310005, Kevin Caves, Chris Sheils, Amanda Hall, Matt Brown, Client and Family.